Generating Maps in RoadRunner
RoadRunner is the recommended software to create maps to be imported into CARLA. This guide outlines what RoadRunner is, things to consider when building the map and how to export custom maps ready for importing into CARLA.
- Introduction to RoadRunner
- Before you start
- Build a map in RoadRunner
- Export a map in RoadRunner
- Next steps
Introduction to RoadRunner
RoadRunner is an interactive editor that lets you design 3D scenes for simulating and testing automated driving systems. It can be used to create road layouts and accompanying OpenDRIVE and geometry information. Find out more about RoadRunner here.
RoadRunner is part of the MATLAB Campus-Wide Licenses, so many universities can provide unlimited academic access. Check if your university has access. Reach out to automated-driving@mathworks.com for any questions or troubles regarding accessibility. There is also a trial version available.
A license for RoadRunner is also available to everyone participating in the CARLA Leaderboard. Click here for more information.
Before you start
You will need to install RoadRunner. You can follow the installation guide at the Mathworks website.
Build a map in RoadRunner
The specifics of how to build a map in RoadRunner go beyond the scope of this guide, however, there are video tutorials available in the RoadRunner documentation.
Keep in mind that a map heavy with props can slow the import process significantly. This is because Unreal Engine needs to convert every mesh to an Unreal asset. If you plan to import your map into a source build version of CARLA, we highly recommend that you only create the road layout in RoadRunner and leave any customization until after the map has been imported into Unreal Engine. CARLA provides several tools that you can use in the Unreal Engine editor to simplify the customization process.
Export a map in RoadRunner
Below is a basic guideline to export your custom map from RoadRunner. You can find more detailed information about how to export to CARLA in MathWorks' documentation.
Once you have made your map in RoadRunner you will be able to export it. Be aware that the road layout cannot be modified after it has been exported. Before exporting, ensure that:
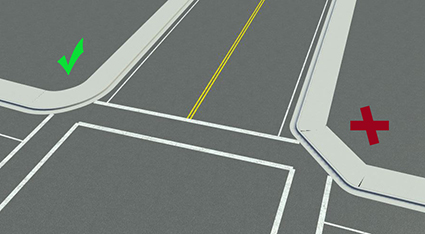
- The map is centered at (0,0) to ensure the map can be visualized correctly in Unreal Engine.
- The map definition is correct.
- The map validation is correct, paying close attention to connections and geometries.
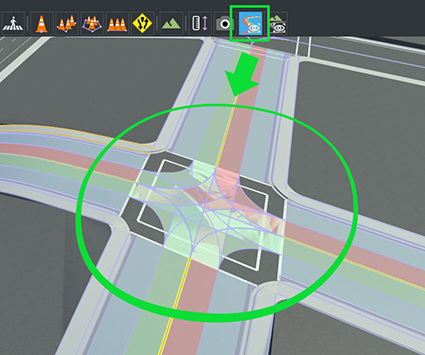
Once the map is ready, click on the OpenDRIVE Preview Tool button to visualize the OpenDRIVE road network and give everything one last check.
Note
OpenDrive Preview Tool makes it easier to test the integrity of the map. If there are any errors with junctions, click on Maneuver Tool, and Rebuild Maneuver Roads.
When you are ready to export:
1. Export the scene using the CARLA option:
- In the main toolbar, select
File->Export->CARLA (.fbx, .xodr, .rrdata.xml)
2. In the window that pops up:
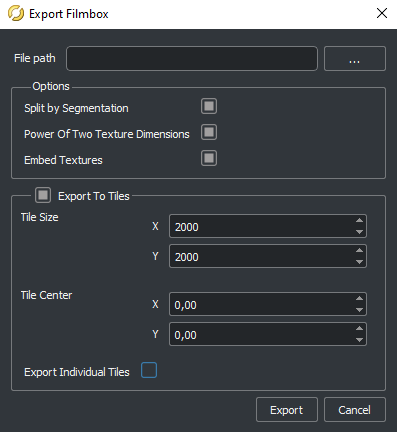
Check the following options:
- Split by Segmentation: Divides the mesh by semantic segmentation.
- Power of Two Texture Dimensions: Improves performance.
- Embed Textures: Ensures textures are embedded in the mesh.
- Export to Tiles: Choose the size of the tile or leave unchecked for only one piece.
Leave unchecked:
- Export Individual Tiles: Generates one
.fbxfile with all map pieces.
3. Choose the directory where you want to export your files and click Export. This will generate <mapName>.fbx and <mapName>.xodr files among others.
Warning
Make sure that the .xodr and the .fbx files have the same name.
Next steps
You are now ready to import your map into CARLA. The next step will depend upon the kind of CARLA installation you are using:
- For users of CARLA built from source, follow the guide here.
- For users of a packaged (binary) version of CARLA, follow the guide here.
If you have any questions about the process, then you can ask in the forum.