Add a new vehicle
This tutorial covers step by step the process to add a new vehicle model. From the very moment the model is finished, to a simple test in CARLA.
Important
This tutorial only applies to users that work with a build from source, and have access to the Unreal Editor.
Add a 4 wheeled vehicle
Bind the skeleton
CARLA provides a general skeleton for 4-wheeled vehicles that must be used by all of them. The position of the bones can be changed, but rotating them, adding new ones or changing the hierarchy will lead to errors.
1. Download the skeleton from the CARLA repositories. Here is the link to General4WheeledVehicleSkeleton, the reference skeleton for 4 wheeled vehicles.
2. Import the skeleton into the 3D project of the new vehicle. This could be in Maya, Blender or whichever software used for modelling.
3. Bind the bones to the corresponding portions of the mesh. Make sure to center the wheels' bones within the mesh.
- Front left wheel —
Wheel_Front_Left. - Front right wheel —
Wheel_Front_Right. - Rear left wheel —
Wheel_Rear_Left. - Rear right wheel —
Wheel_Rear_Right. - Rest of the mesh —
VehicleBase.
Warning
Do not add new bones, change their names or the hierarchy.
4. Export the result. Select all the meshes and the base of the skeleton and export as .fbx.
Import and prepare the vehicle
-
1. Create a new folder named
<vehicle_name>inContent/Carla/Static/Vehicle.
-
2. Import the
.fbxin its folder. The Skelletal Mesh will appear along with two new files,<vehicle_name>_PhysicsAssetsand<vehicle_name>_Skeleton.- 2.1 - Import Content Type —
Geometry and Skinning Weights. - 2.2 - Normal Import Method —
Import Normals. - 2.3 - Material import method — Optionally choose
Do not create materialsand uncheckImport Texturesto avoid Unreal creating its own default materials.
- 2.1 - Import Content Type —
Note
If Unreal does not create the vehicle materials, these will have to be created manually.
- 3. Open
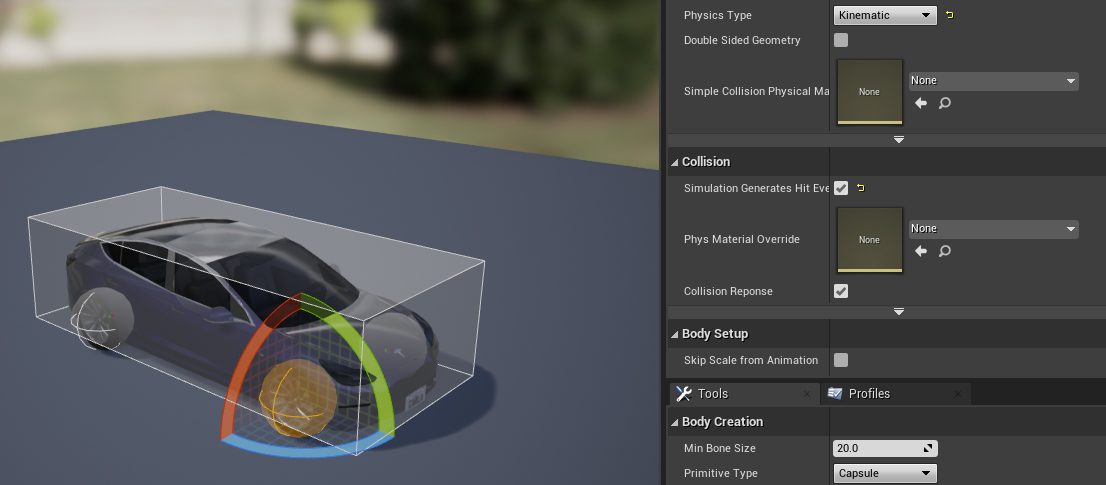
<vehicle_name>_PhysicsAssetsto set the vehicle colliders.- 3.1 - Change the wheels' colliders — Select a sphere and adjust it to the shape of the wheel.
- 3.2 - Change the wheels' Physics Type — Select
Kinematicfor all of them. - 3.3 - Change the general collider — Select a box and adjust it to the shape of the vehicle.
- 3.4 - Enable Simulation Generates Hit Event — Check it for all of the physics' bodies.
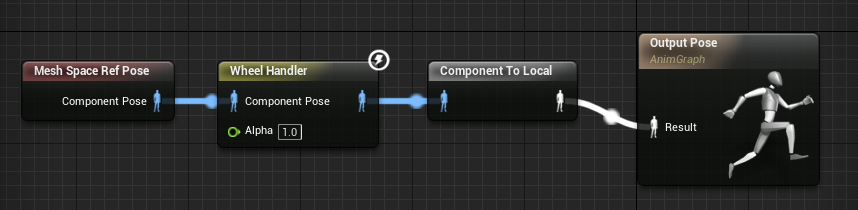
- 4. Create the Animation Blueprint. In the new vehicle folder, click right and go to
Create advanced asset/Animation/Animation blueprint.- 4.1 - Parent Class —
VehicleAnimInstance. - 4.2 - Skeleton —
<vehicle_name>_Skeleton. - 4.3 - Rename the blueprint —
BP_<vehicle_name>_anim. - 4.4 - Copy an existing Animation Blueprint — Go to
Content/Carla/Static/Vehicleand choose any vehicle folder. Open its Animation Blueprint and copy the content from the AnimGraph. - 4.5 - Compile the Animation Blueprint — Connect the content in the blueprint and click the button
Compileon the top left corner.
- 4.1 - Parent Class —
- 5. Create a folder for the vehicle blueprints. Go to
Content/Carla/Blueprints/Vehiclesand create a new folder<vehicle_name>.
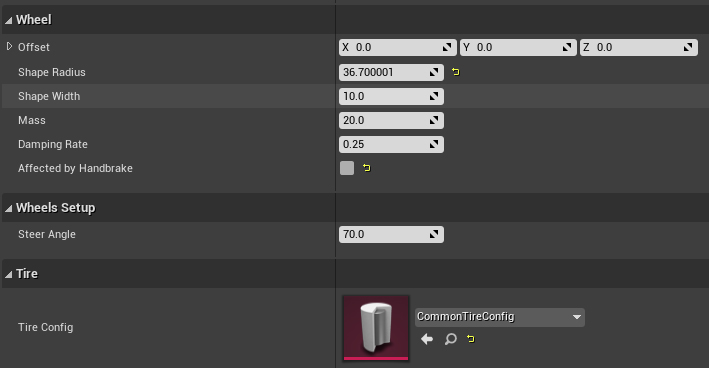
- 6. Create blueprints for the wheels. Inside the folder, right-click and go to
Created advanced assets/Blueprints class. Create two blueprints derived fromVehicleWheel, one named<vehicle_name>_FrontWheeland the other<vehicle_name>_RearWheel.- 6.1 - Shape radius — Exactly the radius, not diameter, of the wheel mesh.
- 6.2 - Rig Config —
CommonTireConfig. - 6.3 - On the front wheel — Set
Steer Angle, default is70. UncheckAffected by Handbrake. - 6.4 - On the rear wheel — Set
Steer Angleto0. CheckAffected by Handbrake.
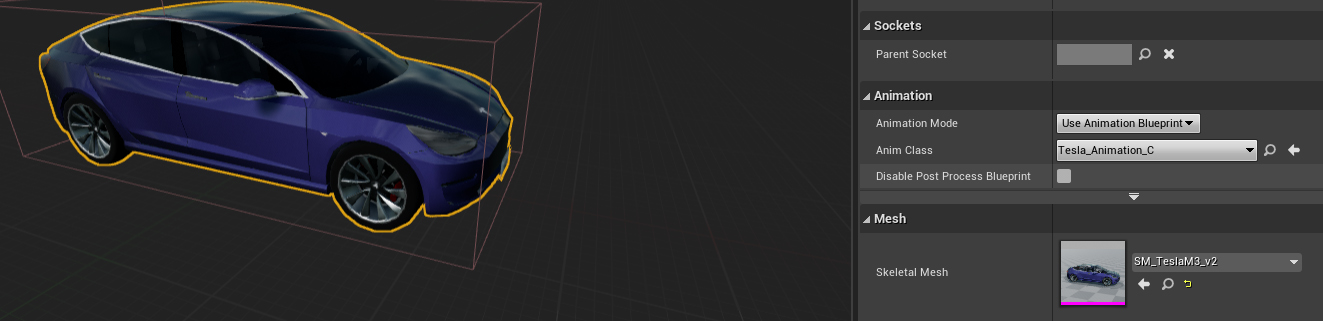
- 7. Create a blueprint for the vehicle. Inside the folder, create another blueprint derived from
BaseVehiclePawnand namedBP_<vehicle_name>.- 7.1 - Mesh — Choose the skelletal mesh of the vehicle.
- 7.2 - Anim class — Choose the Animation blueprint created in step 4.
- 7.3 - Vehicle bound — Adjust it to include the whole volume of the vehicle.
Note
These options appear in the menu Components on the left side of the window.
- 8. Pair the wheels with their blueprint. In
Vehicle Movement/Wheel Setupsexpand the menu and prepare each wheel.- 8.1 - Wheel_Front_Left —
<vehicle_model>_FrontWheel - 8.2 - Wheel_Front_Right —
<vehicle_model>_FrontWheel - 8.3 - Wheel_Rear_Left —
<vehicle_model>_RearWheel - 8.4 - Wheel_Rear_Right —
<vehicle_model>_RearWheel
- 8.1 - Wheel_Front_Left —
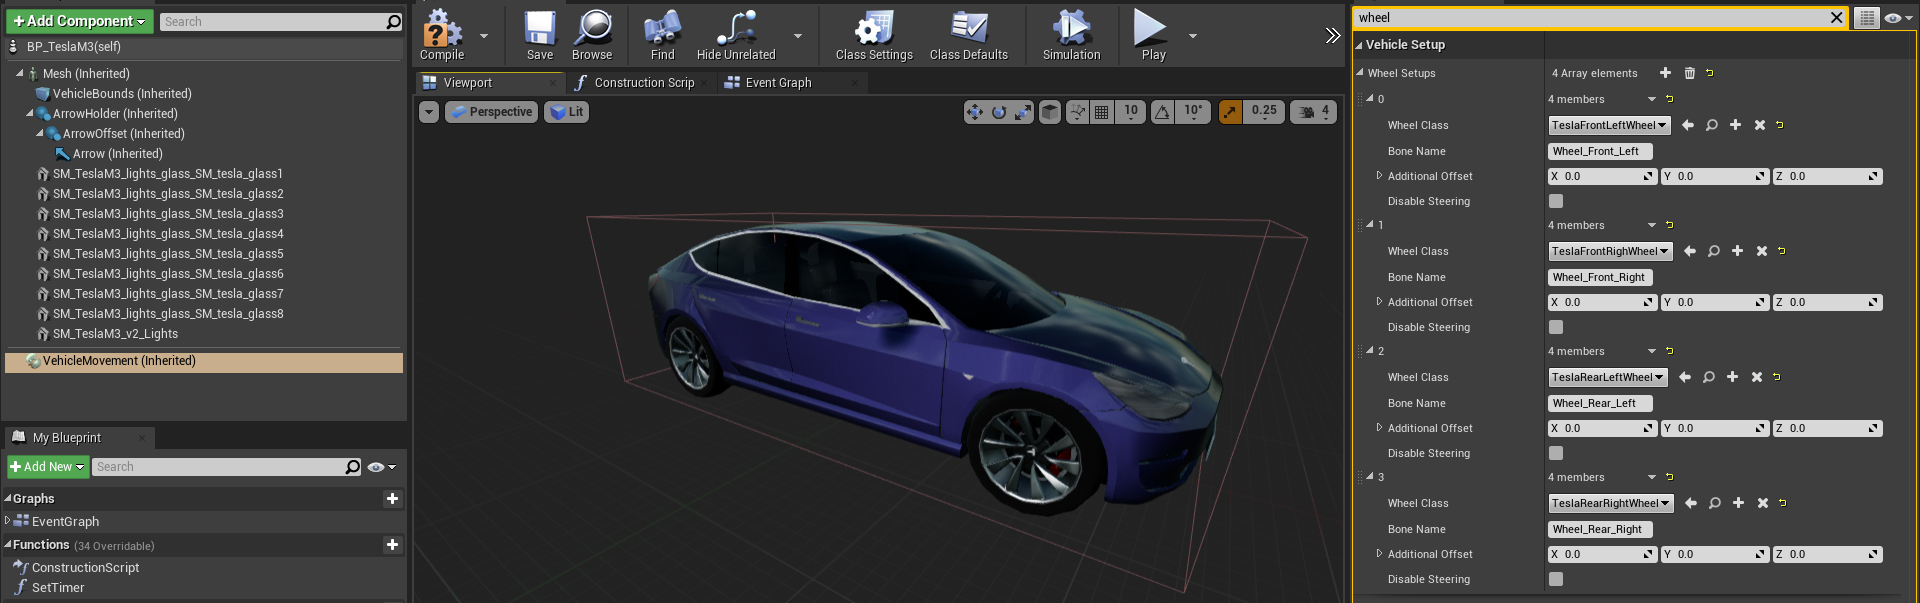
- 9 - Compile the blueprint — Click the button
Compileon the top left corner.
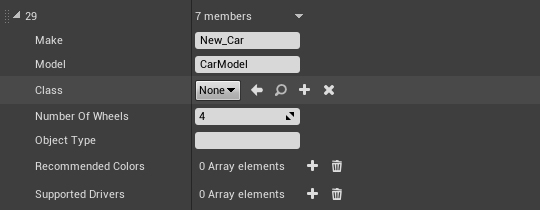
- 10 - Add the vehicle. In
Content/Carla/Blueprint/Vehicle, open theVehicleFactoryand add a new element to the array of vehicles.- 10.1 - Make — Choose a name to be used in Unreal.
- 10.2 - Model — Choose the name to be used in the blueprint library in CARLA.
- 10.3 - Class —
BP_<vehicle_name>. - 10.4 - Recommended colours — Optionally, provide a set of recommended colours for the vehicle.
- 11. Test the vehicle. Launch CARLA, open a terminal in
PythonAPI/examplesand run the following command.
python3 manual_control.py --filter <model_name> # The name used in step 10.2
Add a 2 wheeled vehicle
Adding 2 wheeled vehicles is similar to adding a 4 wheeled one but due to the complexity of the animation you'll need to set up aditional bones to guide the driver's animation. Here is the link to the reference skeleton for 2 wheeled vehicles.
As with the 4 wheeled vehicles, orient the model towards positive "x" and every bone axis towards positive x and with the z axis facing upwards.
Bone Setup:
  - Bike_Rig:                   # The origin point of the mesh. Place it in the point 0 of the scenecomment
    - BikeBody:                 # The model's body centre.
      - Pedals:                 # If the vehicle is a bike bind the pedalier to this bone, will rotate with the bike acceleration.
        - RightPedal:           # Sets the driver's feet position and rotates with the pedalier if the vehicle is a bike.
        - LeftPedal:            # ^
      - RearWheel:              # Rear Wheel of the vehicle
      - Handler:                # Rotates with the frontal wheel of the vehicle bind the vehicle handler to it.
        - HandlerMidBone:       # Positioned over the front wheel bone to orient the handler with the wheel
        - HandlerRight:         # Sets the position of the driver's hand, no need to bind it to anything.
        - HandlerLeft:          # ^
      - Frontwheel:             # Frontal wheel of the vehicle.
      - RightHelperRotator:     # This four additional bones are here for an obsolete system of making the bike stable by using aditional invisible wheels
        - RightHelprWheel:      # ^
      - LeftHelperRotator:      # ^
        - LeftHelperWheel:      # ^
      - Seat:                   # Sets the position of the drivers hip bone. No need to bind it to anything but place it carefully.
1. Import fbx as Skelletal Mesh to its own folder inside Content/Carla/Static/Vehicles/2Wheeled. When importing select "General2WheeledVehicleSkeleton" as skelleton A Physics asset should be automatically created and linked.
2. Tune the Physics asset. Delete the automatically created ones and add boxes to the BikeBody bone trying to match the shape as possible, make sure generate hit events is enabled.
Add a sphere for each wheel and set their "Physics Type" to "Kinematic".
3. Create folder Content/Blueprints/Vehicles/<vehicle-model>
4. Inside that folder create two blueprint classes derived from "VehicleWheel" class. Call them <vehicle-model>_FrontWheel and <vehicle-model>_RearWheel. Set their "Shape Radius" to exactly match the mesh wheel radius (careful, radius not diameter). Set their "Tire Config" to "CommonTireConfig". On the front wheel uncheck "Affected by Handbrake" and on the rear wheel set "Steer Angle" to zero.
5. Inside the same folder create a blueprint class derived from Base2WheeledVehicle call it <vehicle-model>. Open it for edit and select component "Mesh", setup the "Skeletal Mesh"
and the "Anim Class" to the corresponding ones. Then select the VehicleBounds component and set the size to cover vehicle's area as seen from above.
6. Select component "VehicleMovement", under "Vehicle Setup" expand "Wheel Setups", setup each wheel.
- 0: Wheel Class=
<vehicle-model>_FrontWheel, Bone Name=FrontWheel - 1: Wheel Class=
<vehicle-model>_FrontWheel, Bone Name=FrontWheel - 2: Wheel Class=
<vehicle-model>_RearWheel, Bone Name=RearWheel - 3: Wheel Class=
<vehicle-model>_RearWheel, Bone Name=RearWheel
(You'll notice that we are basically placing two wheels in each bone. The vehicle class unreal provides does not support vehicles with wheel numbers different from 4 so we had to make it believe the vehicle has 4 wheels)
7. Select the variable "is bike" and tick it if your model is a bike. This will activate the pedalier rotation. Leave unmarked if you are setting up a motorbike.
8. Find the variable back Rotation and set it as it fit better select the component SkeletalMesh (The driver) and move it along x axis until its in the seat position.
9. Test it, go to CarlaGameMode blueprint and change "Default Pawn Class" to the newly created bike blueprint.