Add a new map
Users can create their own maps, and run CARLA using these. The creation of the map object is quite independent from CARLA. Nonetheless, the process to ingest it has been refined to be automatic. Thus, the new map can be used in CARLA almost out-of-the-box.
- Introduction
- Create a map with RoadRunner
- Map ingestion in a CARLA package
- Map ingestion in a build from source
- Deprecated ways to import a map
Introduction
RoadRunner is the recommended software to create a map due to its simplicity. Some basic steps on how to do it are provided in the next section. The resulting map should consist of a .fbx and a .xodr with the mesh and road network informtion respectively.
The process of the map ingestion has been simplified to minimize the users' intervention. For said reason, there are certains steps have been automatized.
- Package
.jsonfile and folder structure. Normally packages need a certain folder structure and a.jsonfile describing them to be imported. However, as regards the map ingestion, this can be created automatically during the process. - Traffic signs and traffic lights. The simulator will generate the traffic lights, stops, and yields automatically when running. These will be creatd according to their
.xodrdefinition. The rest of landmarks present in the road map will not be physically on scene, but they can be queried using the API. - Pedestrian navigation. The ingestion will generate a
.binfile describing the pedestrian navigation. It is based on the sidewalks and crosswalks that appear in the OpenDRIVE map. This can only be modified if working in a build from source.
Important
If a map contains additional elements besides the .fbx and .xodr, the package has to be prepared manually.
The map ingestion process differs, depending if the package is destined to be in a CARLA package (e.g., 0.9.9) or a build from source.
There are other ways to import a map into CARLA, which are now deprecated. They require the user to manually set the map ready. Nonetheless, as they may be useful for specific cases when the user wants to customize a specific setting, they are listed in the last section of this tutorial.
Create a map with RoadRunner
RoadRunner is an accessible and powerful software from Vector Zero to create 3D scenes. There is a trial version available at their site, and an installation guide.
The process is quite straightforward, but there are some things to take into account.
- Center the map in (0,0).
- Create the map definition. Take a look at the official tutorials.
- Check the map validation. Take a close look at all connections and geometries.
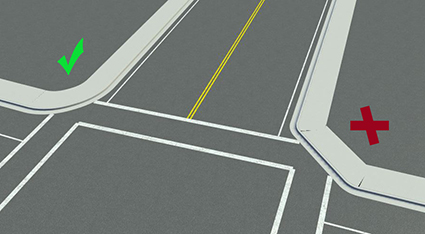
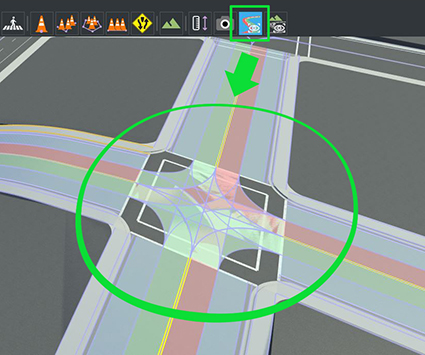
Once the map is ready, click on the OpenDRIVE Preview Tool button to visualize the OpenDRIVE road network. Give one last check to everything. Once the map is exported, it cannot be modified.
Note
OpenDrive Preview Tool makes it easier to test the integrity of the map. If there is any error with junctions, click on Maneuver Tool, and Rebuild Maneuver Roads.
Export from RoadRunner
1. Export the scene using the CARLA option. File/Export/CARLA(.fbx+.xml+.xodr)
2. Leave Export individual Tiles unchecked. This will generate only one .fbx with all the pieces. It makes easier to keep track of the map.
3. Click Export.
This will generate a mapname.fbx and mapname.xodr files within others. There is more detailed information about how to export to CARLA in VectorZero's documentation.
Warning
Make sure that the .xodr and the .fbx files have the same name.
Map ingestion in a CARLA package
This is the recommended method to import a map into a CARLA package. It will run a Docker image of Unreal Engine to import the files, and export them as a standalone package. The Docker image takes 4h and 400GB to be built. However, this is only needed the first time.
1. Build a Docker image of Unreal Engine. Follow these instructions to build the image.
2. Change permissions on the input folder. If no .json file is provided, the Docker will try to create it on the input folder. To be successful, said folder must have all permissions enabled for others.
#Go to the parent folder, where the input folder is contained
chmod 777 input_folder
Note
This is not necessary if the package is prepared manually, and contains a .json file.
2. Run the script to cook the map. In the folder ~/carla/Util/Docker there is a script that connects with the Docker image previously created, and makes the ingestion automatically. It only needs the path for the input and output files, and the name of the package to be ingested. If no .json is provided, the name must be map_package.
python3 docker_tools.py --input ~/path_to_input_folder --output ~/path_to_output_folder --packages map_package
Warning
If the argument --package <package_name> is not provided, the Docker will make a package of CARLA.
3. Locate the package. The Docker should have generated the package map_package.tar.gz in the output path. This is the standalone package for the assets.
4. Import the package into CARLA.
-
On Windows extract the package in the
WindowsNoEditorfolder. -
On Linux move the package to the
Importfolder, and run the script to import it.
cd Util
./ImportAssets.sh
5. Change the name of the package folder. Two packages cannot have the same name in CARLA. Go to Content and find the package. Change the name if necessary, to use one that identifies it.
Map ingestion in a build from source
This is method is meant to be used if working with the source version of CARLA. Place the maps to be imported in the Import folder. The script will make the ingestion, but the pedestrian navigation will have to be generated after that. Make sure that the name of the .xodr and .fbx files are the same for each of the maps being imported. Otherwise, the script will not recognize them as a map.
There are two parameters to be set.
- Name of the package. By default, the script ingest the map or maps in a package named
map_package. This could lead to error the second time an ingestion is made, as two packages cannot have the same name. It is highly recommended to change the name of the package.
ARGS="--package package_name"
- Usage of CARLA materials. By default, the maps imported will use CARLA materials, but this can be changed using a flag.
ARGS="--no-carla-materials"
Check that there is an .fbx and a .xodr for each map in the Import folder, and make the ingestion.
make import ARGS="--package package_name --no-carla-materials"
After the ingestion, only the pedestrian navigation is yet to be generated. However there is an optional step that can be done before that.
- Create new spawning points. Place them a over the road, around 0.5/1m so the wheels do not collide with the ground. These will be used in scripts such as
spawn_npc.py.
Generate pedestrian navigation
The pedestrian navigation is managed using a .bin. However, before generating it, there are two things to be done.
- Add crosswalk meshes. Crosswalks defined inside the
.xodrremain in the logic of the map, but are not visible. For each of them, create a plane mesh that extends a bit over both sidewalks connected. Place it overlapping the ground, and disable its physics and rendering.
Note
To generate new crosswalks, change the name of the mesh to Road_Crosswalk. Avoid doing so if the crosswalk is in the .xodr. Otherwise, it will be duplicated.

- Customize the map. In is common to modify the map after the ingestion. Props such as trees, streetlights or grass zones are added, probably interfering with the pedestrian navigation. Make sure to have the desired result before generating the pedestrian navigation. Otherwise, it will have to be generated again.
Now that the version of the map is final, it is time to generate the pedestrian navigation file.
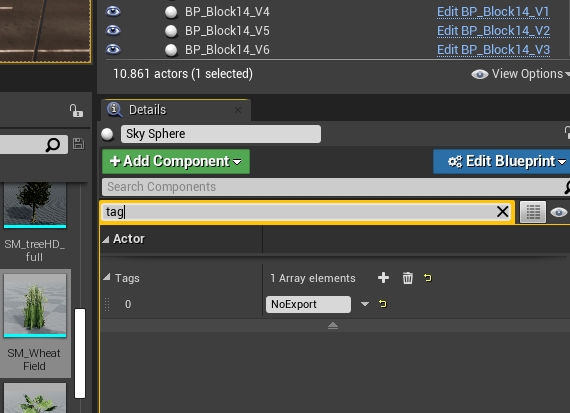
1. Select the Skybox object and add a tag NoExport to it. Otherwise, the map will not be exported, as the size would be too big.
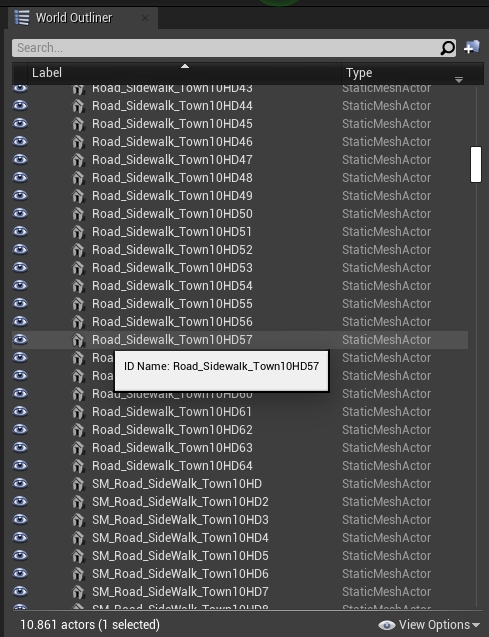
2. Check the name of the meshes. By default, pedestrians will be able to walk over sidewalks, crosswalks, and grass (with minor influence over the rest).
- Sidewalk =
Road_Sidewalk. - Crosswalk =
Road_Crosswalk. - Grass =
Road_Grass.
3. Name these planes following the common format Road_Crosswalk_mapname.
4. Press G to deselect everything, and export the map. File > Export CARLA.... A map_file.obj file will be created in Unreal/CarlaUE4/Saved.
5. Move the map_file.obj and the map_file.xodr to Util/DockerUtils/dist.
6. Run the following command to generate the navigation file.
- Windows
build.bat map_file # map_file has no extension
- Linux
./build.sh map_file # map_file has no extension
7. Move the .bin into the Nav folder of the package that contains the map.
Deprecated ways to import a map
There are other ways to import a map used in previous CARLA releases. These required to manually cook the map and prepare everything, so they are now deprecated. However, they are explained below in case they are needed.
Prepare the package manually
A package needs to follow a certain folder structure and contain a .json file describing it. This steps can be saved under certains circumstances, but doing it manually will always work.
Read how to prepare the folder structure and .json file
Create the folder structure
1. Create a folder inside carla/Import. The name of the folder is not relevant.
2. Create different subfolders for each map to import.
3. Move the files of each map to the corresponding subfolder. A subfolder will contain a specific set of elements.
- The mesh of the map in a
.fbx. - The OpenDRIVE definition in a
.xodr. - Optionally, the textures required by the asset.
For instance, an Import folder with one package containing two maps should have a structure similar to the one below.
Import
│
└── Package01
  ├── Package01.json
  ├── Map01
  │   ├── Asphalt1_Diff.jpg
  │   ├── Asphalt1_Norm.jpg
  │   ├── Asphalt1_Spec.jpg
  │   ├── Grass1_Diff.jpg
  │   ├── Grass1_Norm.jpg
  │   ├── Grass1_Spec.jpg
  │   ├── LaneMarking1_Diff.jpg
  │   ├── LaneMarking1_Norm.jpg
  │   ├── LaneMarking1_Spec.jpg
  │   ├── Map01.fbx
  │   └── Map01.xodr
  └── Map02
      └── Map02.fbx
Create the JSON description
Create a .json file in the root folder of the package. Name the file after the package. Note that this will be the distribution name. The content of the file will describe a JSON array of maps and props with basic information for each of them.
Maps need the following parameters.
- name of the map. This must be the same as the
.fbxand.xodrfiles. - source path to the
.fbx. - use_carla_materials. If True, the map will use CARLA materials. Otherwise, it will use RoadRunner materials.
- xodr Path to the
.xodr.
Props are not part of this tutorial. The field will be left empty. There is another tutorial on how to add new props.
In the end, the .json should look similar to the one below.
{
  "maps": [
    {
      "name": "Map01",
      "source": "./Map01/Map01.fbx",
      "use_carla_materials": true,
      "xodr": "./Map01/Map01.xodr"
    },
    {
      "name": "Map02",
      "source": "./Map02/Map02.fbx",
      "use_carla_materials": false,
      "xodr": "./Map02/Map02.xodr"
    }
  ],
  "props": [
  ]
}
RoadRunner plugin import
This software provides specific plugins for CARLA. Get those and follow some simple steps to get the map.
Read RoadRunner plugin import guide
Warning
These importing tutorials are deprecated. There are new ways to ingest a map to simplify the process.
Plugin installation
These plugins will set everything ready to be used in CARLA. It makes the import process more simple.
1. Locate the plugins in RoadRunner's installation folder
/usr/bin/VectorZero/Tools/Unreal/Plugins.
2. Copy those folders to the CarlaUE4 plugins directory /carla/Unreal/CarlaUE4/Plugins/.
3. Rebuild the plugin following the instructions below.
-
a) Rebuild on Windows.
- Right-click the
.uprojectfile andGenerate Visual Studio project files. - Open the project and build the plugins.
- Right-click the
-
b) Rebuild on Linux.
- Run the following command.
> UE4_ROOT/GenerateProjectFiles.sh -project="carla/Unreal/CarlaUE4/CarlaUE4.uproject" -game -engine
4. Restart Unreal Engine. Make sure the checkbox is on for both plugins Edit > Plugins.
Import map
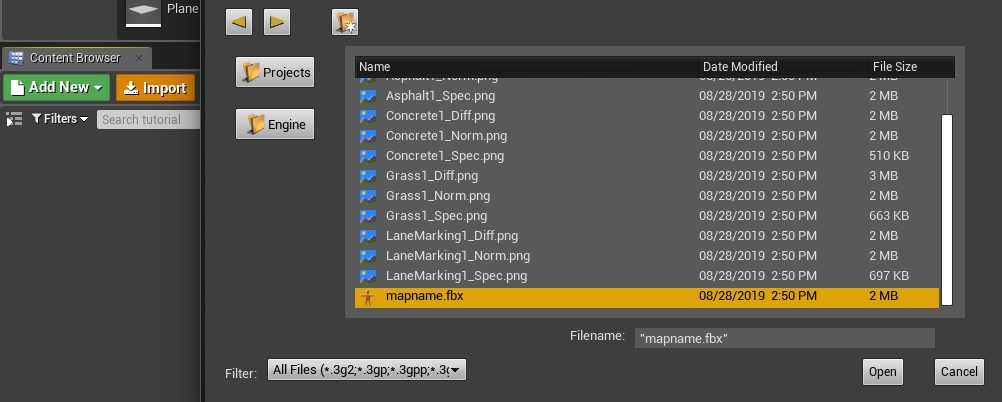
1. Import the mapname.fbx file to a new folder under /Content/Carla/Maps with the Import button.
2. Set Scene > Hierarchy Type to Create One Blueprint Asset (selected by default).
3. Set Static Meshes > Normal Import Method to Import Normals.
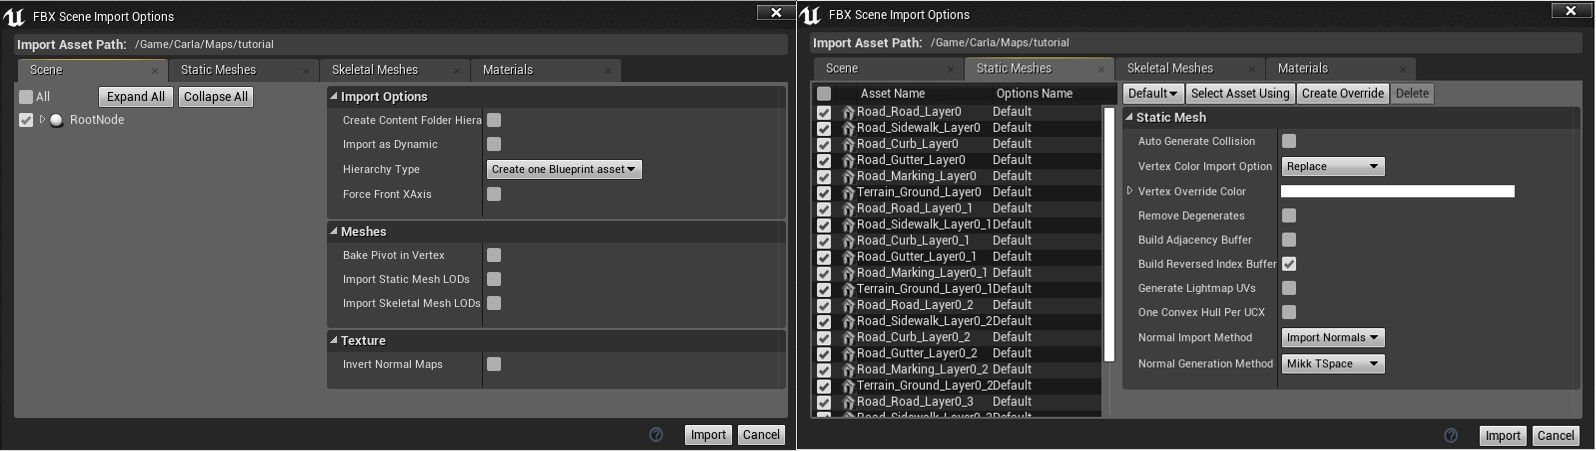
4. Click Import.
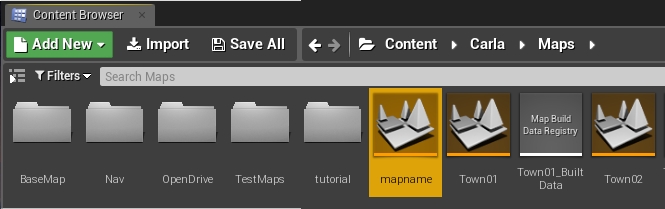
5. Save the current level File > Save Current As... > mapname.
The new map should now appear next to the others in the Unreal Engine Content Browser.
Note
The tags for semantic segmentation will be assigned by the name of the asset. And the asset moved to the corresponding folder in Content/Carla/PackageName/Static. To change these, move them manually after imported.
Manual import
This process requires to go through all the process manually. From importing .fbx and .xodr to setting the static meshes.
Read manual import guide
Warning
These importing tutorials are deprecated. There are new ways to ingest a map to simplify the process.
This is the generic way to import maps into Unreal Engine using any .fbx and .xodr files. As there is no plugin to ease the process, there are many settings to be done before the map is available in CARLA.
1. Create a new level with the Map name in Unreal Add New > Level under Content/Carla/Maps.
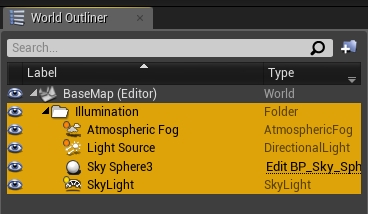
2. Copy the illumination folder and its content from the BaseMap Content/Carla/Maps/BaseMap, and paste it in the new level. Otherwise, the map will be in the dark.
Import binaries
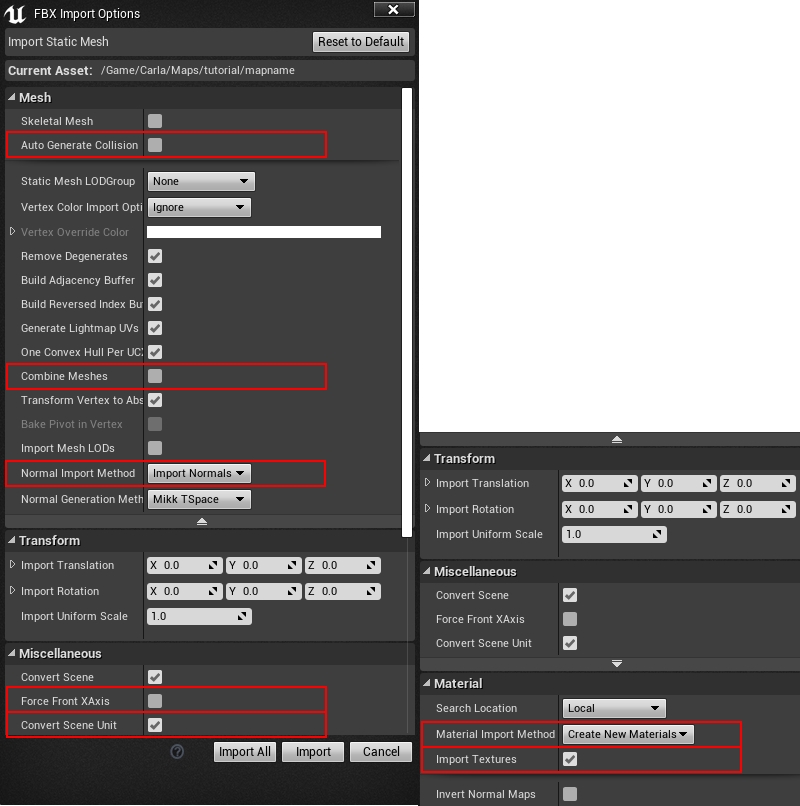
1. Import the mapname.fbx file to a new folder under /Content/Carla/Maps with the Import button. Make sure the following options are unchecked.
- Auto Generate Collision
- Combine Meshes
- Force Front xAxis
- Normal Import Method - To import normals
2. Check the following options.
- Convert Scene Unit
- To import materials and textures.
- Material Import Method - To create new materials
- Import Textures
3. Check that the static meshes have appeared in the chosen folder.
4. Drag the meshes into the level.
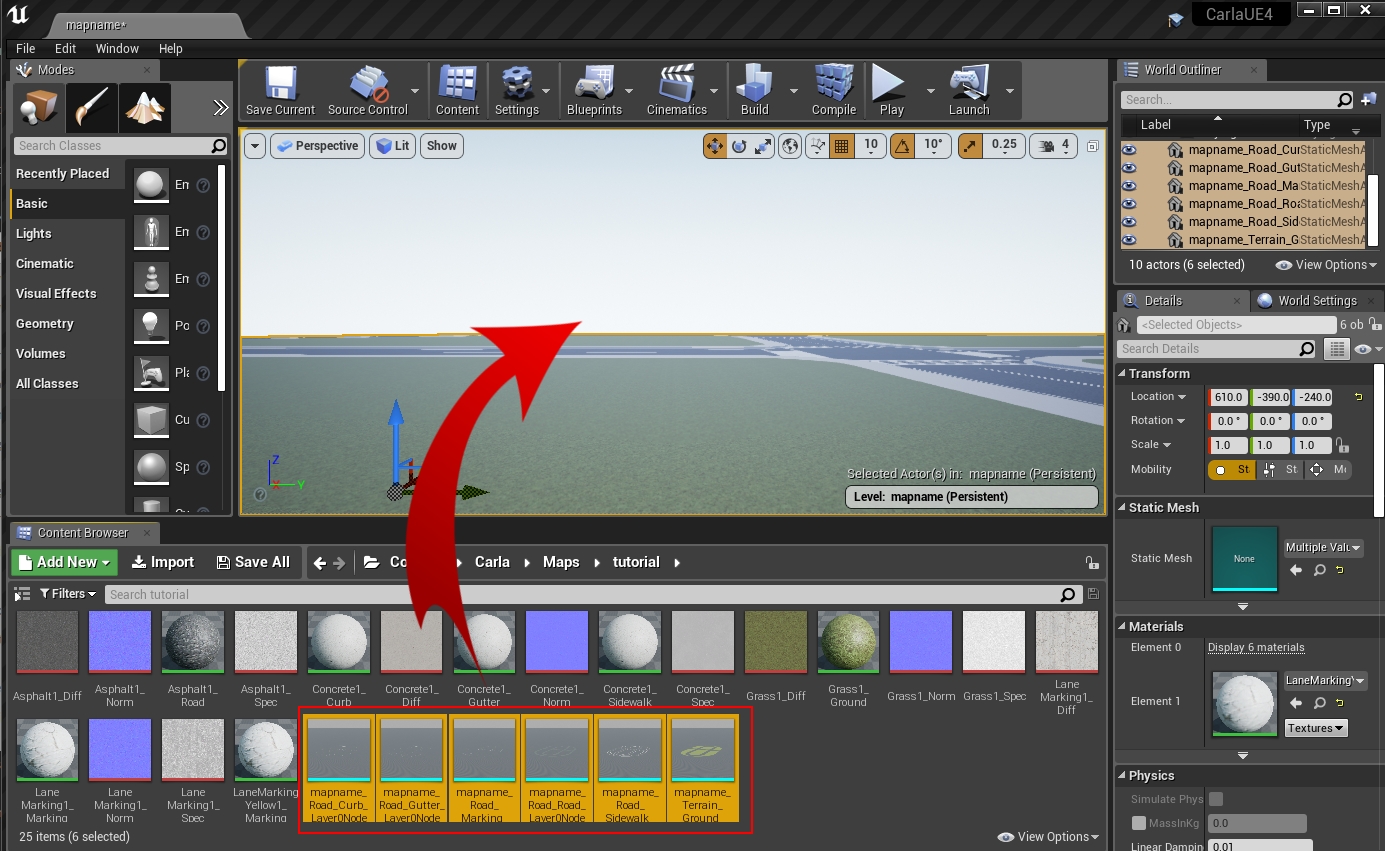
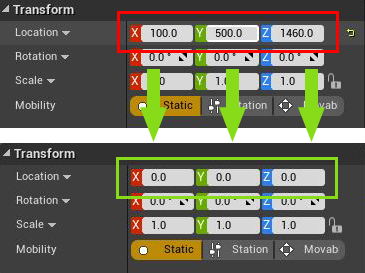
5. Center the meshes at point (0,0,0) when Unreal finishes loading.
6. Generate collisions. Otherwise, pedestrians and vehicles will fall into the abyss.
- Select the meshes meant to have colliders.
- Right-click
Asset Actions > Bulk Edit via Property Matrix....
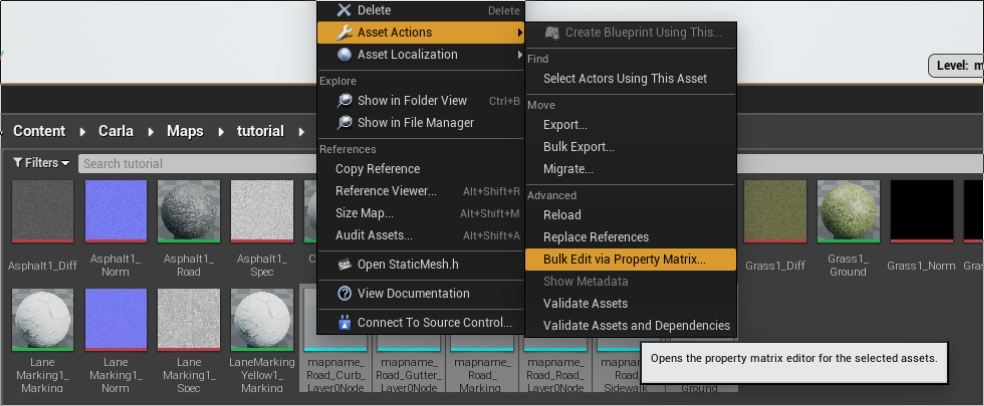
- Search for collision in Property's Matrix search box.
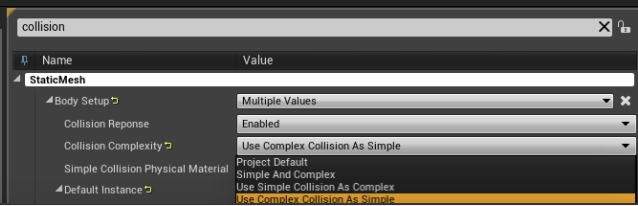
- Change
Collision complexityfromProject DefaulttoUse Complex Collision As Simple.
- Go to
File > Save All.
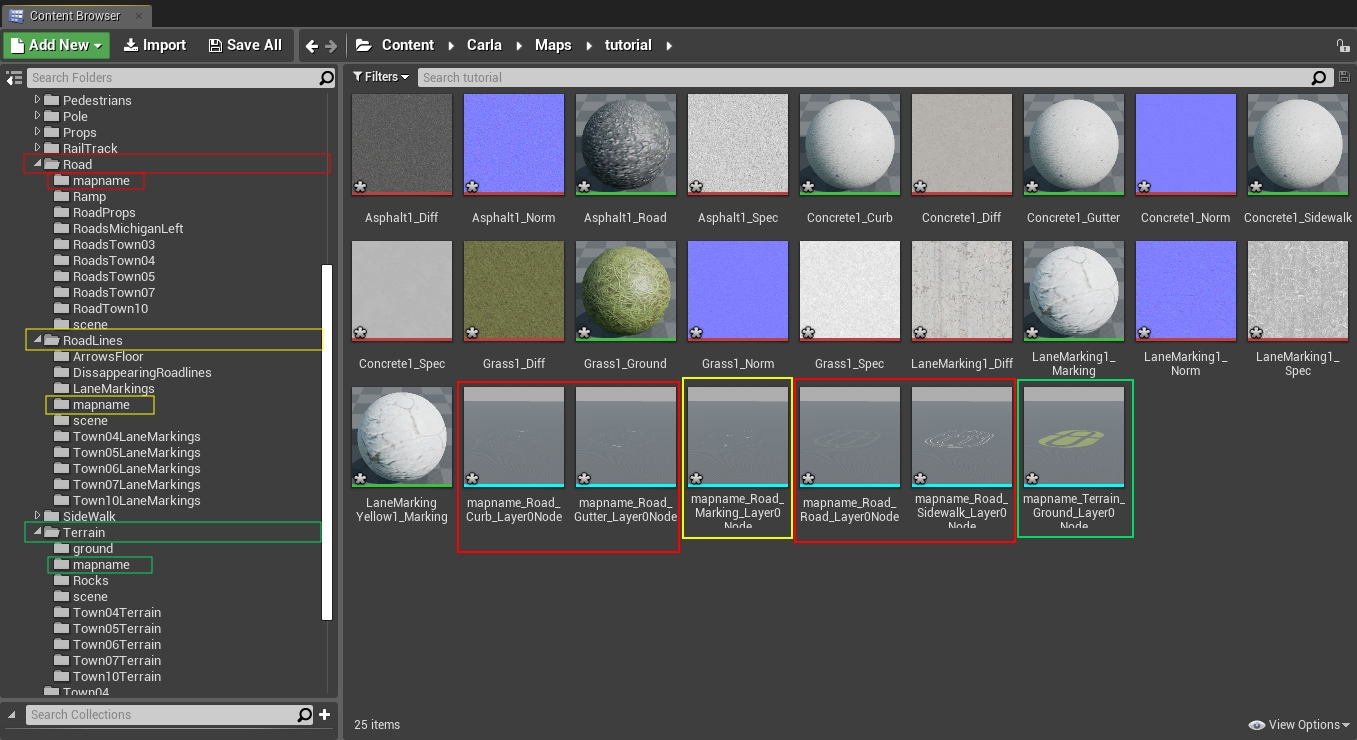
7. Move the static meshes from Content/Carla/Maps/mapfolder to the corresponding Carla/Static subsequent folder. This will be meaningful for the semantic segmentation ground truth.
Terrain/mapnameRoad/mapnameRoadLines/mapname
Content
└── Carla
    ├── Blueprints
    ├── Config
    ├── Exported Maps
    ├── HDMaps
    ├── Maps
    └── Static
        ├── Terrain
        │   └── mapname
        │       └── Static Meshes
        │
        ├── Road
        │   └── mapname
        │       └── Static Meshes
        │
        ├── RoadLines
        |   └── mapname
        |       └── Static Meshes
        └── Sidewalks
            └── mapname
                └── Static Meshes
Import OpenDRIVE files
1. Copy the .xodr file inside the Content/Carla/Maps/OpenDrive folder.
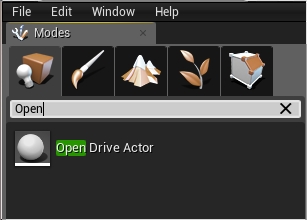
2. Open the Unreal level. Drag the Open Drive Actor inside the level. It will read the level's name. Search the Opendrive file with the same name and load it.
Set traffic and pedestrian behaviour
This software provides specific plugins for CARLA. Get those and follow some simple steps to get the map.
Read traffic and pedestrian setting guide
Warning
These importing tutorials are deprecated. There are new ways to ingest a map to simplify the process.
Set traffic behavior
Once everything is loaded into the level, it is time to create traffic behavior.
1. Click on the Open Drive Actor.
2. Check the following boxes in the same order.
- Add Spawners.
- (Optional for more spawn points) On Intersections.
- Generate Routes.
This will generate a series of RoutePlanner and VehicleSpawnPoint actors. These are used for vehicle spawning and navigation.
Traffic lights and signs
Traffic lights and signs must be placed all over the map.
1. Drag traffic light/sign actors into the level and place them.
2. Adjust the trigger volume for each of them. This will determine their area of influence.
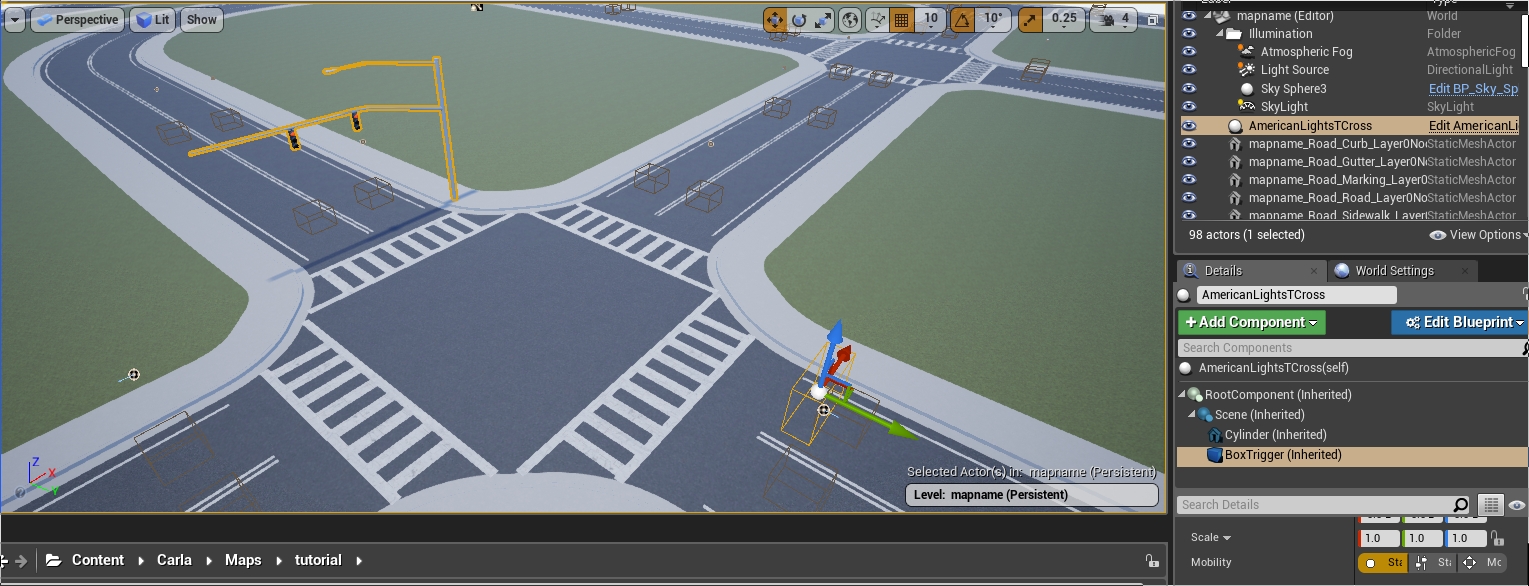
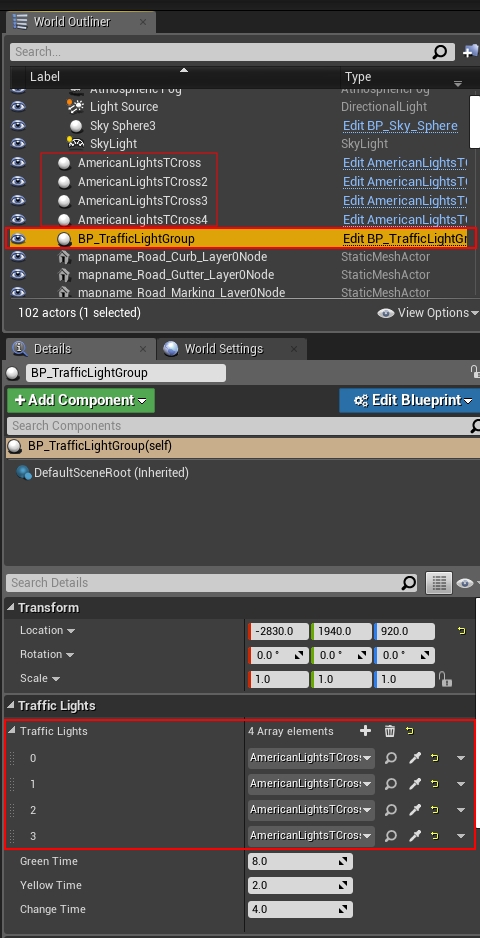
3. In junctions, drag a traffic light group actor into the level. Assign to it all the traffic lights involved and configure their timing. Make sure to understand how do traffic lights work.
4. Test traffic light timing and traffic trigger volumes. This may need trial and error to fit perfectly.
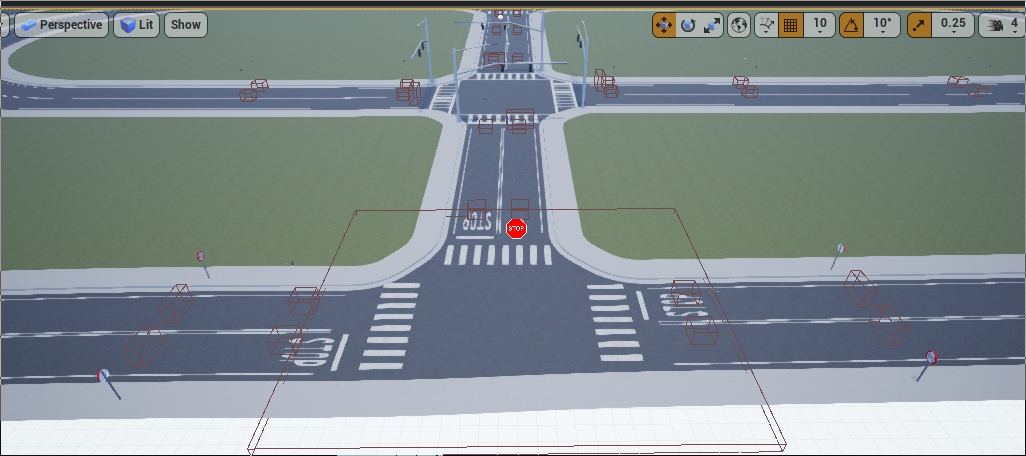
Example: Traffic Signs, Traffic lights and Turn based stop.
Add pedestrian navigation
In order to prepare the map for pedestrian navigation, there are some settings to be done before exporting it.
1. Select the Skybox object and add a tag NoExport to it. Otherwise, the map will not be exported, as the size would be too big. Any geometry that is not involved or interfering in the pedestrian navigation can be tagged also as NoExport.
2. Check the name of the meshes. By default, pedestrians will be able to walk over sidewalks, crosswalks, and grass (with minor influence over the rest).
3. Crosswalks have to be manually created. For each of them, create a plane mesh that extends a bit over both sidewalks connected. Place it overlapping the ground, and disable its physics and rendering.
4. Name these planes following the common format Road_Crosswalk_mapname.
5. Press G to deselect everything, and export the map. File > Export CARLA....
6. Run RecastDemo ./RecastDemo.
- Select
Solo Meshfrom theSampleparameter's box. - Select the mapname.obj file from the
Input Meshparameter's box.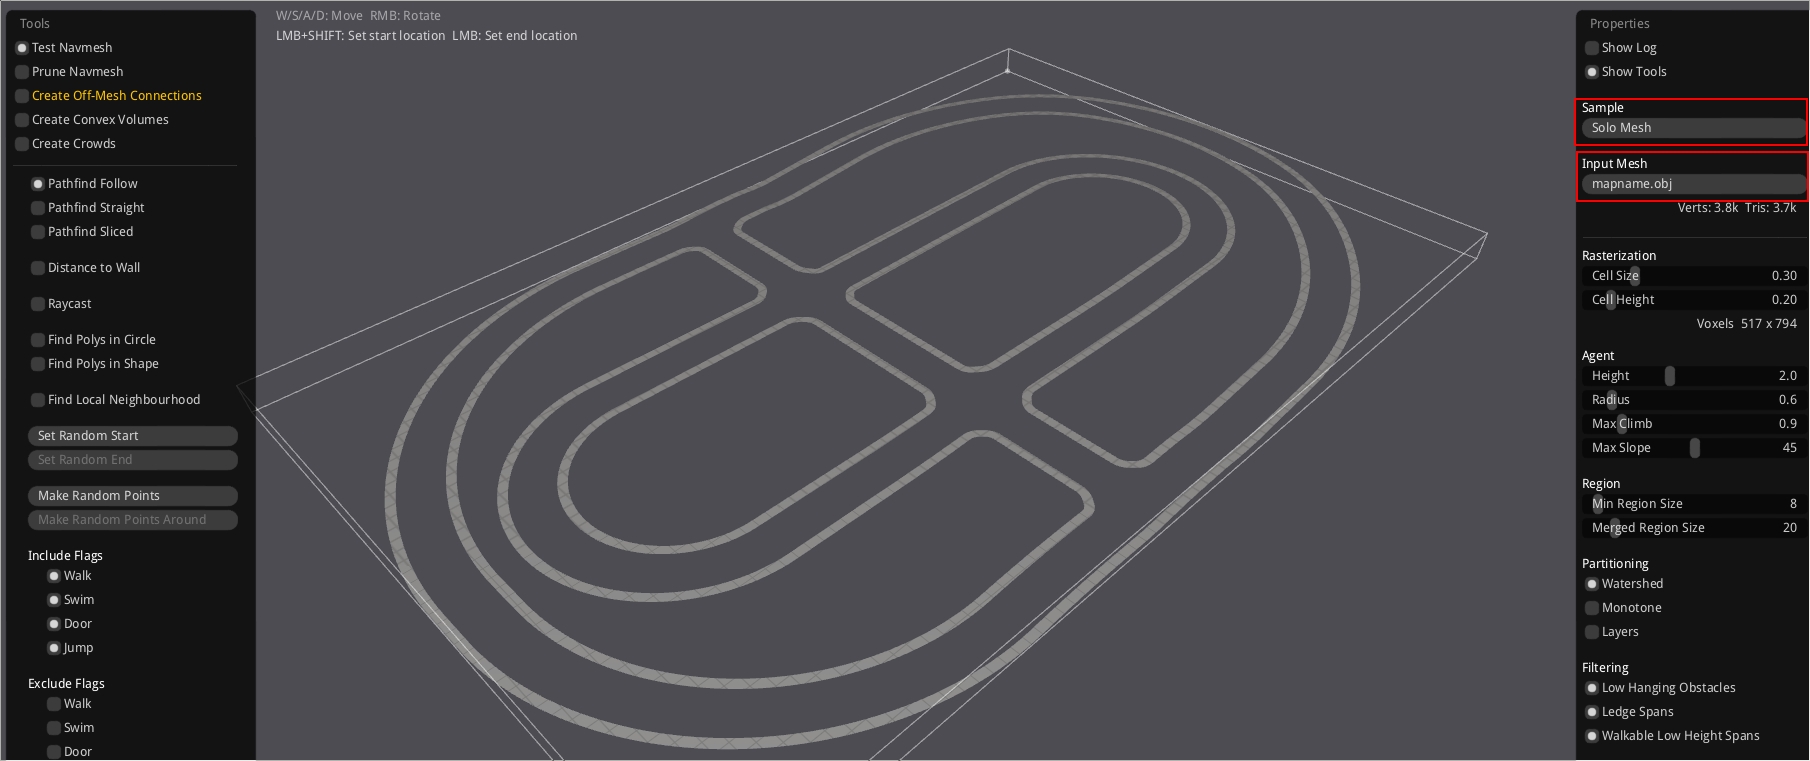
7. Click on the Build button.
8. Once the build has finished, click on the Save button.
9. Change the filename of the binary file generated at RecastDemo/Bin to mapname.bin.
10. Drag the mapname.bin file into the Nav folder under Content/Carla/Maps.
That comprises the process to create and import a new map into CARLA. If during the process any doubts arise, feel free to post these in the forum.