Carla Spawn Objects
The carla_spawn_objects package is used to spawn actors (vehicles, sensors, walkers) and to attach sensors to them.
Configuration and sensor setup
Objects and their attached sensors are defined through a .json file. The default location of this file is within carla_spawn_objects/config/objects.json. To change the location, pass the path to the file via the private ROS parameter, objects_definition_file, when you launch the package:
    # ROS 1
    roslaunch carla_spawn_objects carla_spawn_objects.launch objects_definition_file:=path/to/objects.json

    # ROS 2
    ros2 launch carla_spawn_objects carla_spawn_objects.launch.py objects_definition_file:=path/to/objects.json
Create the configuration
You can find an example in the ros-bridge repository as well as follow this outline to create your own configuration and sensor setup:
{
"objects":
    [
        {
            "type": "<SENSOR-TYPE>",
            "id": "<NAME>",
            "spawn_point": {"x": 0.0, "y": 0.0, "z": 0.0, "roll": 0.0, "pitch": 0.0, "yaw": 0.0},
            <ADDITIONAL-SENSOR-ATTRIBUTES>
        },
        {
            "type": "<VEHICLE-TYPE>",
            "id": "<VEHICLE-NAME>",
            "spawn_point": {"x": -11.1, "y": 138.5, "z": 0.2, "roll": 0.0, "pitch": 0.0, "yaw": -178.7},
            "sensors":
                [
                <SENSORS-TO-ATTACH-TO-VEHICLE>
                ]
        }
        ...
    ]
}
Note
Remember when directly defining positions that ROS uses a right hand system
All sensor attributes are defined as described in the blueprint library.
Spawning vehicles
- If no specific spawn point is defined, vehicles will be spawned at a random location.
-
To define the position at which a vehicle will be spawned, there are two choices:
-
Pass the desired position to a ROS parameter
spawn_point_<VEHICLE-NAME>.<VEHICLE-NAME>will be theidyou gave the vehicle in the.jsonfile:# ROS 1 roslaunch carla_spawn_objects carla_spawn_objects.launch spawn_point_<VEHICLE-NAME>:=x,y,z,roll,pitch,yaw # ROS 2 ros2 launch carla_spawn_objects carla_spawn_objects.launch.py spawn_point_<VEHICLE-NAME>:=x,y,z,roll,pitch,yaw -
Define the initial position directly in the
.jsonfile:{ "type": "vehicle.*", "id": "ego_vehicle", "spawn_point": {"x": -11.1, "y": 138.5, "z": 0.2, "roll": 0.0, "pitch": 0.0, "yaw": -178.7}, }
-
Respawning vehicles
A vehicle can be respawned to a different location during a simulation by publishing to the topic /carla/<ROLE NAME>/<CONTROLLER_ID>/initialpose. To use this functionality:
-
Attach an
actor.pseudo.controlpseudo-actor to the vehicle in the.jsonfile. It should have the sameidvalue as the value passed as<CONTROLLER_ID>used to publish to the topic:{ "type": "vehicle.*", "id": "ego_vehicle", "sensors": [ { "type": "actor.pseudo.control", "id": "control" } ] } -
Launch the
set_inital_posenode, passing the<CONTROLLER_ID>as an argument to the ROS parametercontroller_id(default = 'control'):roslaunch carla_spawn_objects set_initial_pose.launch controller_id:=<CONTROLLER_ID> -
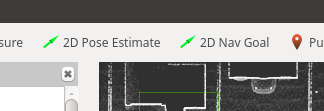
The preferred way to publish the message to set the new position is by using the 2D Pose Estimate button available in the RVIZ interface. You can then click on the viewport of the map to respawn in that position. This will delete the current
ego_vehicleand respawn it at the specified position.
Spawning Sensors
- The initial position for a sensor should be defined directly in the
.jsonfile, as shown above for vehicles. - The spawn point for a sensor attached to a vehicle is considered relative to the vehicle.
Attach sensors to an existing vehicle
Sensors can be attached to an already existing vehicle. To do so:
-
Define the pseudo sensor
sensor.pseudo.actor_listin the.jsonfile. This will give access to a list of already existing actors.... { "type": "sensor.pseudo.actor_list", "id": "actor_list" }, -
Define the rest of the sensors as required.
- Launch the node with the
spawn_sensors_onlyparameter set to True. This will check if an actor with the sameidandtypeas the one specified in the.jsonfile is already active and if so, attach the sensors to this actor.# ROS 1 roslaunch carla_spawn_objects carla_spawn_objects.launch spawn_sensors_only:=True # ROS 2 ros2 launch carla_spawn_objects carla_spawn_objects.launch.py spawn_sensors_only:=True