Python API tutorial
In this tutorial we introduce the basic concepts of the CARLA Python API, as well as an overview of its most important functionalities. The reference of all classes and methods available can be found at Python API reference.
Note
This document applies only to the latest development version.
The API has been significantly changed in the latest versions starting at
0.9.0. We commonly refer to the new API as 0.9.X API as opposed to
the previous 0.8.X API.
First of all, we need to introduce a few core concepts:
- Actor: Actor is anything that plays a role in the simulation and can be moved around, examples of actors are vehicles, pedestrians, and sensors.
- Blueprint: Before spawning an actor you need to specify its attributes, and that's what blueprints are for. We provide a blueprint library with the definitions of all the actors available.
- World: The world represents the currently loaded map and contains the functions for converting a blueprint into a living actor, among other. It also provides access to the road map and functions to change the weather conditions.
Connecting and retrieving the world
To connect to a simulator we need to create a "Client" object, to do so we need to provide the IP address and port of a running instance of the simulator
client = carla.Client('localhost', 2000)
The first recommended thing to do right after creating a client instance is setting its time-out. This time-out sets a time limit to all networking operations, if the time-out is not set networking operations may block forever
client.set_timeout(10.0) # seconds
Once we have the client configured we can directly retrieve the world
world = client.get_world()
Typically we won't need the client object anymore, all the objects created by the world will connect to the IP and port provided if they need to. These operations are usually done in the background and are transparent to the user.
Blueprints
A blueprint contains the information necessary to create a new actor. For instance, if the blueprint defines a car, we can change its color here, if it defines a lidar, we can decide here how many channels the lidar will have. A blueprints also has an ID that uniquely identifies it and all the actor instances created with it. Examples of IDs are "vehicle.nissan.patrol" or "sensor.camera.depth".
The list of all available blueprints is kept in the blueprint library
blueprint_library = world.get_blueprint_library()
The library allows us to find specific blueprints by ID, filter them with wildcards, or just choosing one at random
# Find specific blueprint.
collision_sensor_bp = blueprint_library.find('sensor.other.collision')
# Chose a vehicle blueprint at random.
vehicle_bp = random.choice(blueprint_library.filter('vehicle.bmw.*'))
Some of the attributes of the blueprints can be modified while some other are just read-only. For instance, we cannot modify the number of wheels of a vehicle but we can change its color
vehicles = blueprint_library.filter('vehicle.*')
bikes = [x for x in vehicles if int(x.get_attribute('number_of_wheels')) == 2]
for bike in bikes:
    bike.set_attribute('color', '255,0,0')
Modifiable attributes also come with a list of recommended values
for attr in blueprint:
    if attr.is_modifiable:
        blueprint.set_attribute(attr.id, random.choice(attr.recommended_values))
The blueprint system has been designed to ease contributors adding their custom actors directly in Unreal Editor, we'll add a tutorial on this soon, stay tuned!
Spawning actors
Once we have the blueprint set up, spawning an actor is pretty straightforward
transform = Transform(Location(x=230, y=195, z=40), Rotation(yaw=180))
actor = world.spawn_actor(blueprint, transform)
The spawn actor function comes in two flavours, spawn_actor and
try_spawn_actor. The former will raise an exception if the actor could not be
spawned, the later will return None instead. The most typical cause of
failure is collision at spawn point, meaning the actor does not fit at the spot
we chose; probably another vehicle is in that spot or we tried to spawn into a
static object.
To ease the task of finding a spawn location, each map provides a list of recommended transforms
spawn_points = world.get_map().get_spawn_points()
We'll add more on the map object later in this tutorial.
Finally, the spawn functions have an optional argument that controls whether the actor is going to be attached to another actor. This is specially useful for sensors. In the next example, the camera remains rigidly attached to our vehicle during the rest of the simulation
camera = world.spawn_actor(camera_bp, relative_transform, attach_to=my_vehicle)
Note that in this case, the transform provided is treated relative to the parent actor.
Handling actors
Once we have an actor alive in the world, we can move this actor around and check its dynamic properties
location = actor.get_location()
location.z += 10.0
actor.set_location(location)
print(actor.get_acceleration())
print(actor.get_velocity())
We can even freeze an actor by disabling its physics simulation
actor.set_simulate_physics(False)
And once we get tired of an actor we can remove it from the simulation with
actor.destroy()
Note that actors are not cleaned up automatically when the Python script finishes, if we want to get rid of them we need to explicitly destroy them.
Important
Known issue: To improve performance, most of the methods send requests to the simulator asynchronously. The simulator queues each of these requests, but only has a limited amount of time each update to parse them. If we flood the simulator by calling "set" methods too often, e.g. set_transform, the requests will accumulate a significant lag.
Vehicles
Vehicles are a special type of actor that provide a few extra methods. Apart from the handling methods common to all actors, vehicles can also be controlled by providing throttle, break, and steer values
vehicle.apply_control(carla.VehicleControl(throttle=1.0, steer=-1.0))
These are all the parameters of the VehicleControl object and their default
values
carla.VehicleControl(
    throttle = 0.0
    steer = 0.0
    brake = 0.0
    hand_brake = False
    reverse = False
    manual_gear_shift = False
    gear = 0)
Also, physics control properties can be tuned for vehicles and its wheels
vehicle.apply_physics_control(carla.VehiclePhysicsControl(max_rpm = 5000.0, center_of_mass = carla.Vector3D(0.0, 0.0, 0.0), torque_curve=[[0,400],[5000,400]]))
These properties are controlled through a VehiclePhysicsControl object, which also contains a property to control each wheel's physics through a WheelPhysicsControl object.
carla.VehiclePhysicsControl(
    torque_curve,
    max_rpm,
    moi,
    damping_rate_full_throttle,
    damping_rate_zero_throttle_clutch_engaged,
    damping_rate_zero_throttle_clutch_disengaged,
    use_gear_autobox,
    gear_switch_time,
    clutch_strength,
    mass,
    drag_coefficient,
    center_of_mass,
    steering_curve,
    wheels)
Where: - torque_curve: Curve that indicates the torque measured in Nm for a specific revolutions per minute of the vehicle's engine - max_rpm: The maximum revolutions per minute of the vehicle's engine - moi: The moment of inertia of the vehicle's engine - damping_rate_full_throttle: Damping rate when the throttle is maximum. - damping_rate_zero_throttle_clutch_engaged: Damping rate when the thottle is zero with clutch engaged - damping_rate_zero_throttle_clutch_disengaged: Damping rate when the thottle is zero with clutch disengaged
- use_gear_autobox: If true, the vehicle will have automatic transmission
- gear_switch_time: Switching time between gears
-
clutch_strength: The clutch strength of the vehicle. Measured in Kgm^2/s
-
final_ratio: The fixed ratio from transmission to wheels.
-
forward_gears: List of
GearPhysicsControlobjects. -
mass: The mass of the vehicle measured in Kg
- drag_coefficient: Drag coefficient of the vehicle's chassis
- center_of_mass: The center of mass of the vehicle
- steering_curve: Curve that indicates the maximum steering for a specific forward speed
- wheels: List of
WheelPhysicsControlobjects.
carla.WheelPhysicsControl(
    tire_friction,
    damping_rate,
    max_steer_angle,
    radius,
    max_brake_torque,
    max_handbrake_torque,
    position)
Where: - tire_friction: Scalar value that indicates the friction of the wheel. - damping_rate: The damping rate of the wheel. - max_steer_angle: The maximum angle in degrees that the wheel can steer. - radius: The radius of the wheel in centimeters. - max_brake_torque: The maximum brake torque in Nm. - max_handbrake_torque: The maximum handbrake torque in Nm. - position: The position of the wheel.
carla.GearPhysicsControl(
    ratio,
    down_ratio,
    up_ratio)
Where: - ratio: The transmission ratio of this gear. - down_ratio: The level of RPM (in relation to MaxRPM) where the gear autobox initiates shifting down. - up_ratio: The level of RPM (in relation to MaxRPM) where the gear autobox initiates shifting up.
Our vehicles also come with a handy autopilot
vehicle.set_autopilot(True)
As has been a common misconception, we need to clarify that this autopilot control is purely hard-coded into the simulator and it's not based at all in machine learning techniques.
Finally, vehicles also have a bounding box that encapsulates them
box = vehicle.bounding_box
print(box.location)         # Location relative to the vehicle.
print(box.extent)           # XYZ half-box extents in meters.
Sensors
Sensors are actors that produce a stream of data. Sensors are such a key component of CARLA that they deserve their own documentation page, so here we'll limit ourselves to show a small example of how sensors work
camera_bp = blueprint_library.find('sensor.camera.rgb')
camera = world.spawn_actor(camera_bp, relative_transform, attach_to=my_vehicle)
camera.listen(lambda image: image.save_to_disk('output/%06d.png' % image.frame))
In this example we have attached a camera to a vehicle, and told the camera to save to disk each of the images that are going to be generated.
The full list of sensors and their measurement is explained in Cameras and sensors.
Other actors
Apart from vehicles and sensors, there are a few other actors in the world. The full list can be requested to the world with
actor_list = world.get_actors()
The actor list object returned has functions for finding, filtering, and iterating actors
# Find an actor by id.
actor = actor_list.find(id)
# Print the location of all the speed limit signs in the world.
for speed_sign in actor_list.filter('traffic.speed_limit.*'):
    print(speed_sign.get_location())
Among the actors you can find in this list are
- Traffic lights with a
stateproperty to check the light's current state. - Speed limit signs with the speed codified in their type_id.
- The Spectator actor that can be used to move the view of the simulator window.
Changing the weather
The lighting and weather conditions can be requested and changed with the world object
weather = carla.WeatherParameters(
    cloudyness=80.0,
    precipitation=30.0,
    sun_altitude_angle=70.0)

world.set_weather(weather)

print(world.get_weather())
For convenience, we also provided a list of predefined weather presets that can be directly applied to the world
world.set_weather(carla.WeatherParameters.WetCloudySunset)
The full list of presets can be found in the WeatherParameters reference.
World Snapshot
A world snapshot represents the state of every actor in the simulation at a single frame, a sort of still image of the world with a timestamp. With this feature it is possible to record the location of every actor and make sure all of them were captured at the same frame without the need of using synchronous mode.
# Retrieve a snapshot of the world at this point in time.
world_snapshot = world.get_snapshot()

# Wait for the next tick and retrieve the snapshot of the tick.
world_snapshot = world.wait_for_tick()

# Register a callback to get called every time we receive a new snapshot.
world.on_tick(lambda world_snapshot: do_something(world_snapshot))
The world snapshot contains a timestamp and a list of actor snapshots. Actor snapshots do not allow to operate on the actor directly as they only contain data about the physical state of the actor, but you can use their id to retrieve the actual actor. And the other way around, you can look up snapshots by id (average O(1) complexity).
timestamp = world_snapshot.timestamp
timestamp.frame_count
timestamp.elapsed_seconds
timestamp.delta_seconds
timestamp.platform_timestamp


for actor_snapshot in world_snapshot:
    actor_snapshot.get_transform()
    actor_snapshot.get_velocity()
    actor_snapshot.get_angular_velocity()
    actor_snapshot.get_acceleration()

    actual_actor = world.get_actor(actor_snapshot.id)


actor_snapshot = world_snapshot.find(actual_actor.id)
Map and waypoints
One of the key features of CARLA is that our roads are fully annotated. All our maps come accompanied by OpenDrive files that defines the road layout. Furthermore, we provide a higher level API for querying and navigating this information.
These objects were a recent addition to our API and are still in heavy development, we hope to make them much more powerful soon.
Let's start by getting the map of the current world
map = world.get_map()
For starters, the map has a name attribute that matches the name of the
currently loaded city, e.g. Town01. And, as we've seen before, we can also ask
the map to provide a list of recommended locations for spawning vehicles,
map.get_spawn_points().
However, the real power of this map API comes apparent when we introduce waypoints. We can tell the map to give us a waypoint on the road closest to our vehicle
waypoint = map.get_waypoint(vehicle.get_location())
This waypoint's transform is located on a drivable lane, and it's oriented
according to the road direction at that point.
Waypoints also have function to query the "next" waypoints; this method returns a list of waypoints at a certain distance that can be accessed from this waypoint following the traffic rules. In other words, if a vehicle is placed in this waypoint, give me the list of posible locations that this vehicle can drive to. Let's see a practical example
# Retrieve the closest waypoint.
waypoint = map.get_waypoint(vehicle.get_location())

# Disable physics, in this example we're just teleporting the vehicle.
vehicle.set_simulate_physics(False)

while True:
    # Find next waypoint 2 meters ahead.
    waypoint = random.choice(waypoint.next(2.0))
    # Teleport the vehicle.
    vehicle.set_transform(waypoint.transform)
The map object also provides methods for generating in bulk waypoints all over the map at an approximated distance between them
waypoint_list = map.generate_waypoints(2.0)
For routing purposes, it is also possible to retrieve a topology graph of the roads
waypoint_tuple_list = map.get_topology()
this method returns a list of pairs (tuples) of waypoints, for each pair, the first element connects with the second one. Only the minimal set of waypoints to define the topology are generated by this method, only a waypoint for each lane for each road segment in the map.
Finally, to allow access to the whole road information, the map object can be converted to OpenDrive format, and saved to disk as such.
Recording and Replaying system
CARLA includes now a recording and replaying API, that allows to record a simulation in a file and later replay that simulation. The file is written on server side only, and it includes which actors are created or destroyed in the simulation, the state of the traffic lights and the position and orientation of all vehicles and pedestrians.
To start recording we only need to supply a file name:
client.start_recorder("recording01.log")
To stop the recording, we need to call:
client.stop_recorder()
At any point we can replay a simulation, specifying the filename:
client.replay_file("recording01.log")
The replayer replicates the actor and traffic light information of the recording each frame.
For more details, Recorder and Playback system
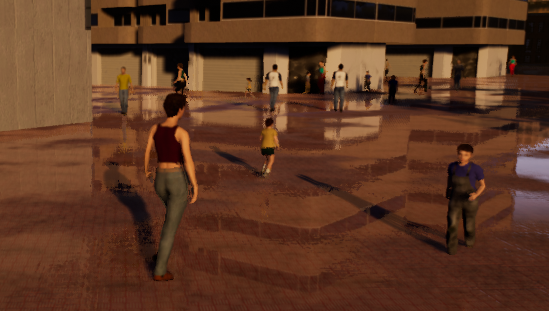
Pedestrians
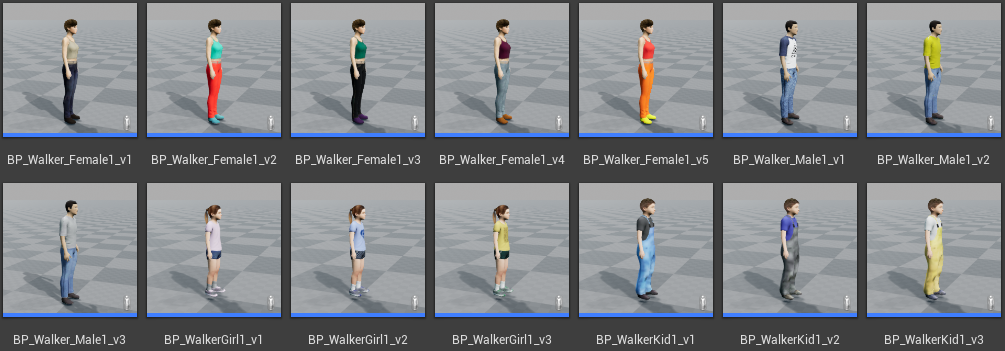
We can get a lit of all pedestrians from the blueprint library and choose one:
world = client.get_world()
blueprintsWalkers = world.get_blueprint_library().filter("walker.pedestrian.*")
walker_bp = random.choice(blueprintsWalkers)
We can get a list of random points where to spawn the pedestrians. Those points are always from the areas where the pedestrian can walk:
# 1. take all the random locations to spawn
spawn_points = []
for i in range(50):
    spawn_point = carla.Transform()
    spawn_point.location = world.get_random_location_from_navigation()
    if (spawn_point.location != None):
        spawn_points.append(spawn_point)
Now we can spawn the pedestrians at those positions using a batch of commands:
# 2. build the batch of commands to spawn the pedestrians
batch = []
for spawn_point in spawn_points:
    walker_bp = random.choice(blueprintsWalkers)
    batch.append(carla.command.SpawnActor(walker_bp, spawn_point))

# apply the batch
results = client.apply_batch_sync(batch, True)
for i in range(len(results)):
    if results[i].error:
        logging.error(results[i].error)
    else:
        walkers_list.append({"id": results[i].actor_id})
We save the id of each walker from the results of the batch, in a dictionary because we will assign to them also a controller. We need to create the controller that will manage the pedestrian automatically:
# 3. we spawn the walker controller
batch = []
walker_controller_bp = world.get_blueprint_library().find('controller.ai.walker')
for i in range(len(walkers_list)):
    batch.append(carla.command.SpawnActor(walker_controller_bp, carla.Transform(), walkers_list[i]["id"]))

# apply the batch
results = client.apply_batch_sync(batch, True)
for i in range(len(results)):
    if results[i].error:
        logging.error(results[i].error)
    else:
        walkers_list[i]["con"] = results[i].actor_id
We create the controller as child of the walker, so the location we pass is (0,0,0).
At this point we have a list of pedestrians with a controller each one, but we need to get the actual actor from the id. Because the controller is a child of the pedestrian, we need to put all id in the same list so the parent can find the child in the same list.
# 4. we put altogether the walkers and controllers id to get the objects from their id
for i in range(len(walkers_list)):
    all_id.append(walkers_list[i]["con"])
    all_id.append(walkers_list[i]["id"])
all_actors = world.get_actors(all_id)
The list all_actors has now all the actor objects we created.
At this point is a good idea to wait for a tick on client, because then the server has time to send all new data about the new actors we just created (we need the transform of each one updated). So we can do a call like:
# wait for a tick to ensure client receives the last transform of the walkers we have just created
world.wait_for_tick()
After that, our client has the data about the actors updated.
Using the controller we can set the locations where we want each pedestrian walk to:
# 5. initialize each controller and set target to walk to (list is [controller, actor, controller, actor ...])
for i in range(0, len(all_actors), 2):
    # start walker
    all_actors[i].start()
    # set walk to random point
    all_actors[i].go_to_location(world.get_random_location_from_navigation())
    # random max speed
    all_actors[i].set_max_speed(1 + random.random())    # max speed between 1 and 2 (default is 1.4 m/s)
There we have set at each pedestrian (through its controller) a random point and random speed. When they reach the target point then automatically walk to another random point.
If the target point is not reachable, then they reach the closest point from the are where they are.
To destroy the pedestrians, we need to stop them from the navigation, and then destroy the objects (actor and controller):
# stop pedestrians (list is [controller, actor, controller, actor ...])
for i in range(0, len(all_id), 2):
    all_actors[i].stop()

# destroy pedestrian (actor and controller)
client.apply_batch([carla.command.DestroyActor(x) for x in all_id])