Cameras and sensors
Important
Since version 0.8.0 the positions of the sensors are specified in meters instead of centimeters. Always relative to the vehicle.
Cameras and sensors can be added to the player vehicle by defining them in the
settings sent by the client on every new episode. This can be done either by
filling a CarlaSettings Python class (client_example.py)
or by loading an INI settings file (CARLA Settings example).
This document describes the details of the different cameras/sensors currently available as well as the resulting images produced by them.
Although we plan to extend the sensor suite of CARLA in the near future, at the moment there are four different sensors available.
Note
The images are sent by the server as a BGRA array of bytes. The provided Python client retrieves the images in this format, it's up to the users to parse the images and convert them to the desired format. There are some examples in the PythonClient folder showing how to parse the images.
There is a fourth post-processing effect available for cameras, None, which provides a view with of the scene with no effect, not even scene lighting; we will skip this one in the following descriptions.
We provide a tool to convert raw depth and semantic segmentation images in bulk
to a more human readable palette of colors. It can be found at
"Util/ImageConverter". Alternatively, they can also be converted
using the functions at carla.image_converter Python module.
Note that all the sensor data comes with a frame number stamp, this frame number matches the one received in the measurements. This is especially useful for running the simulator in asynchronous mode and synchronize sensor data on the client side.
Camera: Scene final
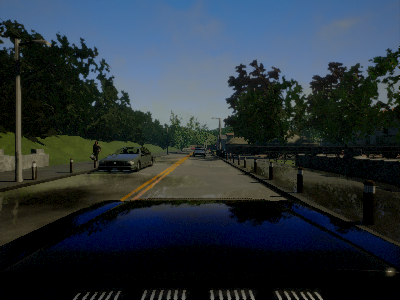
The "scene final" camera provides a view of the scene after applying some post-processing effects to create a more realistic feel. These are actually stored in the Level, in an actor called PostProcessVolume and not in the Camera. We use the following post process effects:
- Vignette Darkens the border of the screen.
- Grain jitter Adds a bit of noise to the render.
- Bloom Intense lights burn the area around them.
- Auto exposure Modifies the image gamma to simulate the eye adaptation to darker or brighter areas.
- Lens flares Simulates the reflection of bright objects on the lens.
- Depth of field Blurs objects near or very far away of the camera.
Python
camera = carla.sensor.Camera('MyCamera', PostProcessing='SceneFinal')
camera.set(FOV=90.0)
camera.set_image_size(800, 600)
camera.set_position(x=0.30, y=0, z=1.30)
camera.set_rotation(pitch=0, yaw=0, roll=0)

carla_settings.add_sensor(camera)
CarlaSettings.ini
[CARLA/Sensor/MyCamera]
SensorType=CAMERA
PostProcessing=SceneFinal
ImageSizeX=800
ImageSizeY=600
FOV=90
PositionX=0.30
PositionY=0
PositionZ=1.30
RotationPitch=0
RotationRoll=0
RotationYaw=0
Camera: Depth map
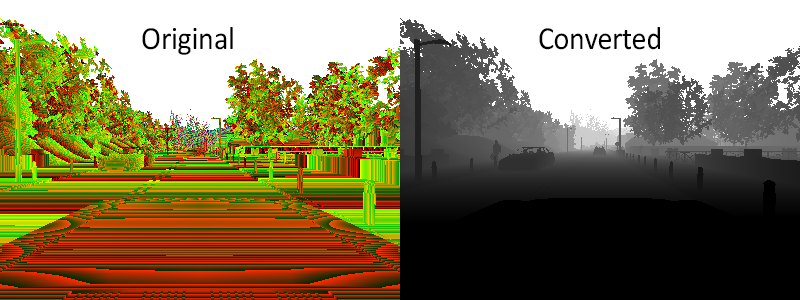
The "depth map" camera provides an image with 24 bit floating precision point codified in the 3 channels of the RGB color space. The order from less to more significant bytes is R -> G -> B.
| R | G | B | int24 | |
|---|---|---|---|---|
| 00000000 | 00000000 | 00000000 | 0 | min (near) |
| 11111111 | 11111111 | 11111111 | 16777215 | max (far) |
Our max render distance (far) is 1km.
-
To decodify our depth first we get the int24.
R + G*256 + B*256*256 -
Then normalize it in the range [0, 1].
Ans / ( 256*256*256 - 1 ) -
And finally multiply for the units that we want to get. We have set the far plane at 1000 metres.
Ans * far
The generated "depth map" images are usually converted to a logarithmic grayscale for display. A point cloud can also be extracted from depth images as seen in "PythonClient/point_cloud_example.py".
Python
camera = carla.sensor.Camera('MyCamera', PostProcessing='Depth')
camera.set(FOV=90.0)
camera.set_image_size(800, 600)
camera.set_position(x=0.30, y=0, z=1.30)
camera.set_rotation(pitch=0, yaw=0, roll=0)

carla_settings.add_sensor(camera)
CarlaSettings.ini
[CARLA/Sensor/MyCamera]
SensorType=CAMERA
PostProcessing=Depth
ImageSizeX=800
ImageSizeY=600
FOV=90
PositionX=0.30
PositionY=0
PositionZ=1.30
RotationPitch=0
RotationRoll=0
RotationYaw=0
Camera: Semantic segmentation
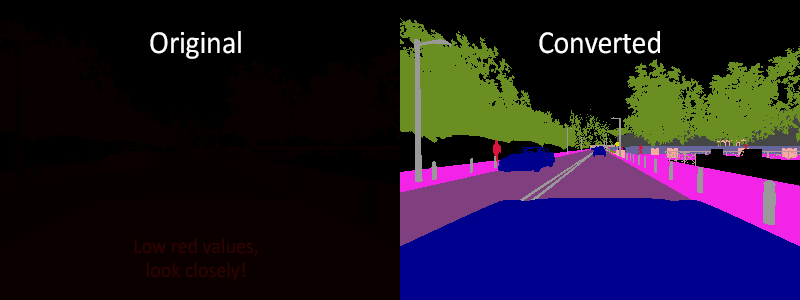
The "semantic segmentation" camera classifies every object in the view by displaying it in a different color according to the object class. E.g., pedestrians appear in a different color than vehicles.
The server provides an image with the tag information encoded in the red channel. A pixel with a red value of x displays an object with tag x. The following tags are currently available
| Value | Tag |
|---|---|
| 0 | None |
| 1 | Buildings |
| 2 | Fences |
| 3 | Other |
| 4 | Pedestrians |
| 5 | Poles |
| 6 | RoadLines |
| 7 | Roads |
| 8 | Sidewalks |
| 9 | Vegetation |
| 10 | Vehicles |
| 11 | Walls |
| 12 | TrafficSigns |
This is implemented by tagging every object in the scene before hand (either at begin play or on spawn). The objects are classified by their relative file path in the project. E.g., every mesh stored in the "Unreal/CarlaUE4/Content/Static/Pedestrians" folder it's tagged as pedestrian.
Note
Adding new tags:
At the moment adding new tags is not very flexible and requires to modify
the C++ code. Add a new label to the ECityObjectLabel enum in "Tagger.h",
and its corresponding filepath check inside GetLabelByFolderName()
function in "Tagger.cpp".
Python
camera = carla.sensor.Camera('MyCamera', PostProcessing='SemanticSegmentation')
camera.set(FOV=90.0)
camera.set_image_size(800, 600)
camera.set_position(x=0.30, y=0, z=1.30)
camera.set_rotation(pitch=0, yaw=0, roll=0)

carla_settings.add_sensor(camera)
CarlaSettings.ini
[CARLA/Sensor/MyCamera]
SensorType=CAMERA
PostProcessing=SemanticSegmentation
ImageSizeX=800
ImageSizeY=600
FOV=90
PositionX=0.30
PositionY=0
PositionZ=1.30
RotationPitch=0
RotationRoll=0
RotationYaw=0
Ray-cast based Lidar
A rotating Lidar implemented with ray-casting. The points are computed by adding
a laser for each channel distributed in the vertical FOV, then the rotation is
simulated computing the horizontal angle that the Lidar rotated this frame, and
doing a ray-cast for each point that each laser was supposed to generate this
frame; PointsPerSecond / (FPS * Channels).
Each frame the server sends a packet with all the points generated during a
1/FPS interval. During the interval the physics wasn’t updated so all the
points in a packet reflect the same "static picture" of the scene.
The received LidarMeasurement object contains the following information
| Key | Type | Description |
|---|---|---|
| horizontal_angle | float | Angle in XY plane of the lidar this frame (in degrees). |
| channels | uint32 | Number of channels (lasers) of the lidar. |
| point_count_by_channel | uint32 | Number of points per channel captured this frame. |
| point_cloud | PointCloud | Captured points this frame. |
Python
lidar = carla.sensor.Lidar('MyLidar')
lidar.set(
    Channels=32,
    Range=50,
    PointsPerSecond=100000,
    RotationFrequency=10,
    UpperFovLimit=10,
    LowerFovLimit=-30)
lidar.set_position(x=0, y=0, z=1.40)
lidar.set_rotation(pitch=0, yaw=0, roll=0)

carla_settings.add_sensor(lidar)
CarlaSettings.ini
[CARLA/Sensor/MyLidar]
SensorType=LIDAR_RAY_CAST
Channels=32
Range=50
PointsPerSecond=100000
RotationFrequency=10
UpperFOVLimit=10
LowerFOVLimit=-30
PositionX=0
PositionY=0
PositionZ=1.40
RotationPitch=0
RotationYaw=0
RotationRoll=0