How to create and import a new map
1 Create a new map
Files needed:
- Binaries
.fbx- All meshes you need to build the map, i.e., roads, lanemarking, sidewalk, ect. - OpenDRIVE
.xodr- Road network information that cars need to circulate on the map.
It is possible to modify an existing CARLA map, check out the map customization tutorial.
The following steps will introduce the RoadRunner software for map creation. If the map is created by other software, go to this section.
2 Create a new map with RoadRunner
RoadRunner is a powerful software from Vector Zero to create 3D scenes. Using RoadRunner is easy, in a few steps you will be able to create an impressive scene. You can download a trial of RoadRunner at VectorZero's web page.

Read VectorZero's RoadRunner documentation to install it and get started.
They also have very useful tutorials on how to use RoadRunner, check them out!
Important
Create the map centered arround (0, 0).
2.1 Validate the map
- Check that all connections and geometries seem correct.

- Visualize the OpenDRIVE road network by clicking on the
OpenDRIVE Preview Toolbutton and export.
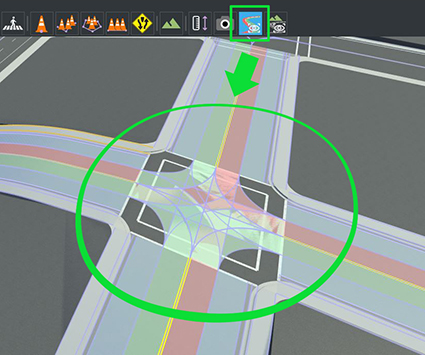
Note
The OpenDrive Preview Tool button lets you test the integrity of the current map.
If there is any error with map junctions, click on Maneuver Tool
and Rebuild Maneuver Roads buttons.
2.2 Export the map
After verifying that everything is correct, it is time to export the map to CARLA.
-
Export the scene using the CARLA option in the main menu:
File > Export > CARLA (.fbx + .xml + .xodr). -
Leave
Export individual Tilesunchecked, this will generate only one fbx file with all the pieces making it easier to keep track of the map.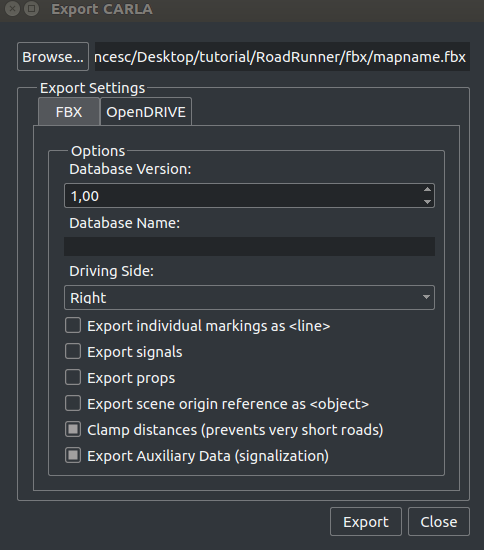
-
Click
Export.
This will generate a mapname.fbx and mapname.xodr files within others.
For a more in-depth guide on how to use the exportation option, check VectorZeros's documentation.
3 Importing into Unreal
This section is divided into two. The first part shows how to import a map from RoadRunner
and the second part shows how to import a map from other software that generates .fbx and .xodr files.
Important
The .xodr OpenDRIVE file should have the same name as the binary file .fbx
i.e. mapname.fbx mapname.xodr.
We have also created a new way to import assets into Unreal,
check this guide.md)!
3.1 Importing from RoadRunner
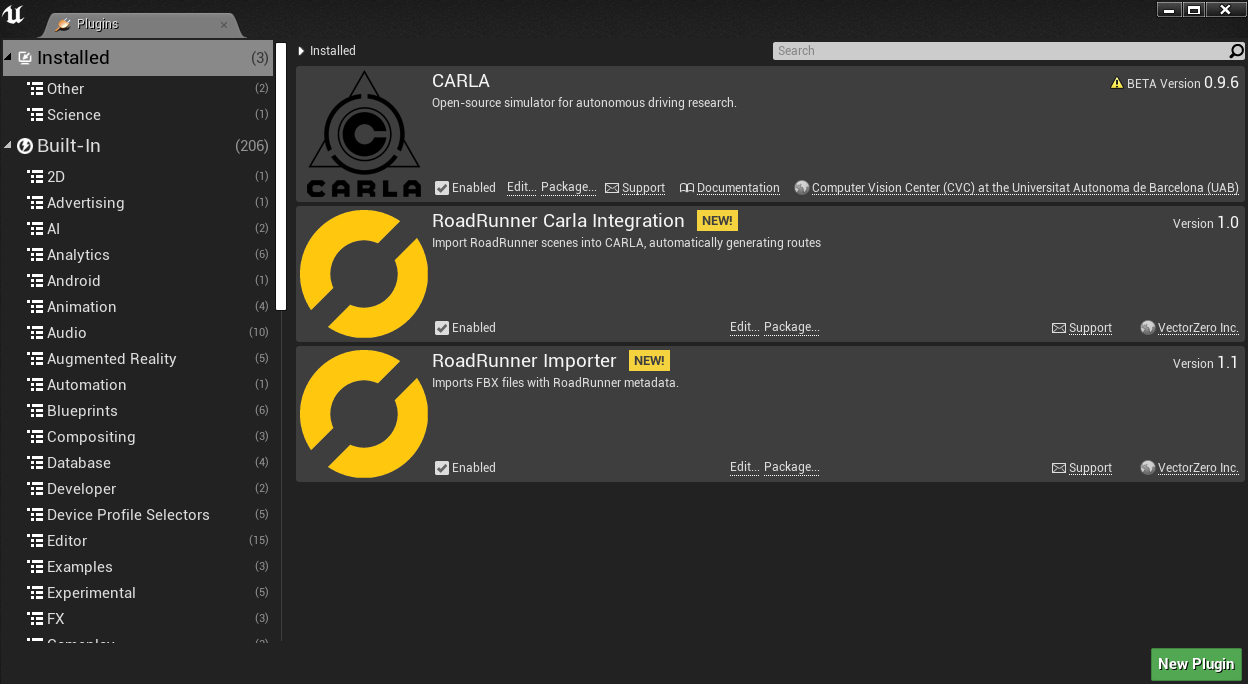
3.1.1 Plugin Installation
RoadRunner provides a series of plugins that make the importing simpler.
-
Locate the plugins under RoadRunner's installation folder:
/usr/bin/VectorZero/Tools/Unreal/Plugins. -
Copy those folders to the CarlaUE4 plugins directory:
/carla/Unreal/CarlaUE4/Plugins/. -
Rebuild the plugin.
Rebuild on Windows
-
Generate project files.
- Right-click the
.uprojectfile andGenerate Visual Studio project files.
- Right-click the
-
Open the project and build the plugins.
Rebuild on Linux
> UE4_ROOT/GenerateProjectFiles.sh -project="carla/Unreal/CarlaUE4/CarlaUE4.uproject" -game -engine
Finally, restart Unreal Engine and make sure the checkbox is on for both plugins Edit > Plugins.
3.1.2 Importing
-
Import the mapname.fbx file to a new folder under
/Content/Carla/Mapswith theImportbutton.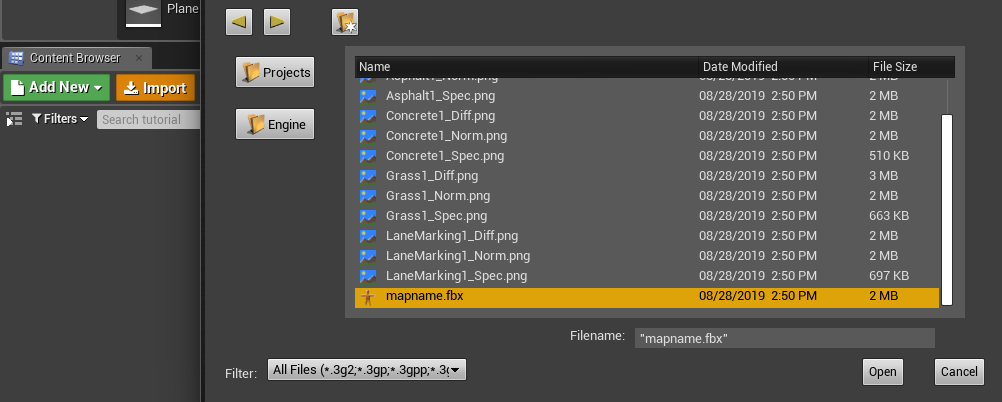
-
Set
Scene > Hierarchy Typeto Create One Blueprint Asset (selected by default). -
Set
Static Meshes > Normal Import Methodto Import Normals.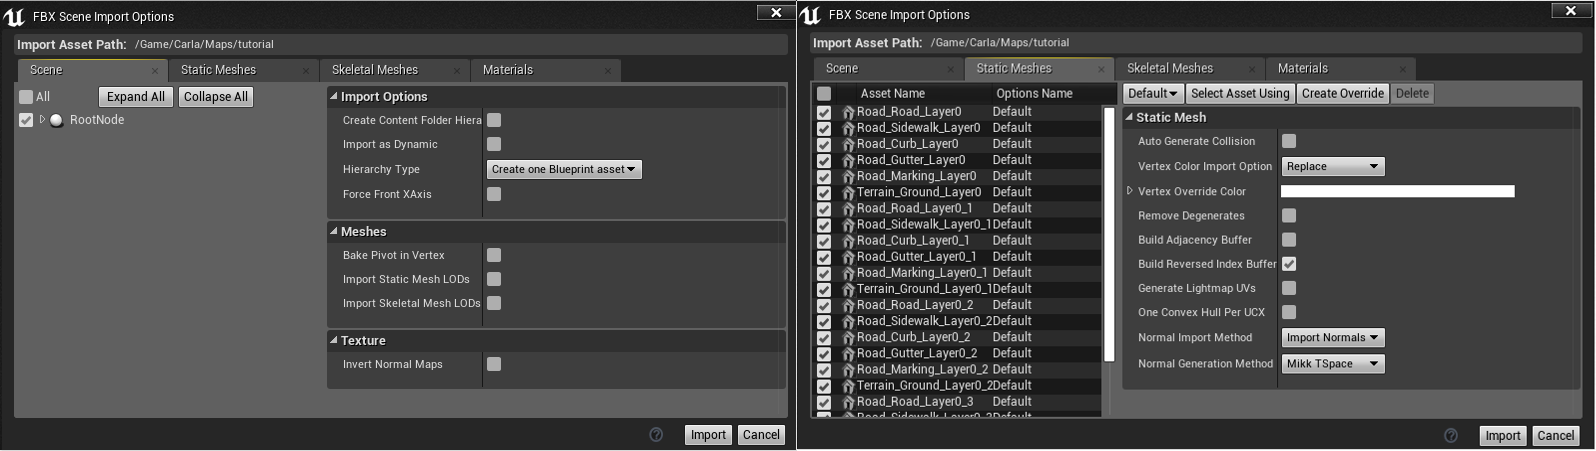
-
Click
Import. -
Save the current level
File > Save Current As...> mapname.
The new map should now appear next to the others in the Unreal Engine Content Browser.
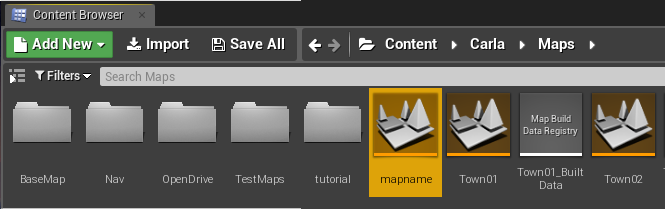
And that's it! The map is ready!
3.2 Importing from the files
This is the generic way to import maps into Unreal.
- Create a new level with the Map name in Unreal
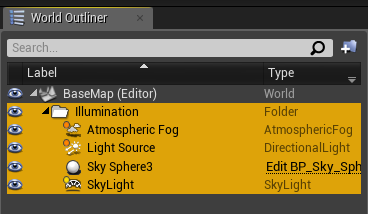
Add New > LevelunderContent/Carla/Maps. - Copy the Illumination folder and its content from the BaseMap
Content/Carla/Maps/BaseMapand paste it in the new level, otherwise, the map will be in the dark.
3.2.1 Binaries (.fbx)
-
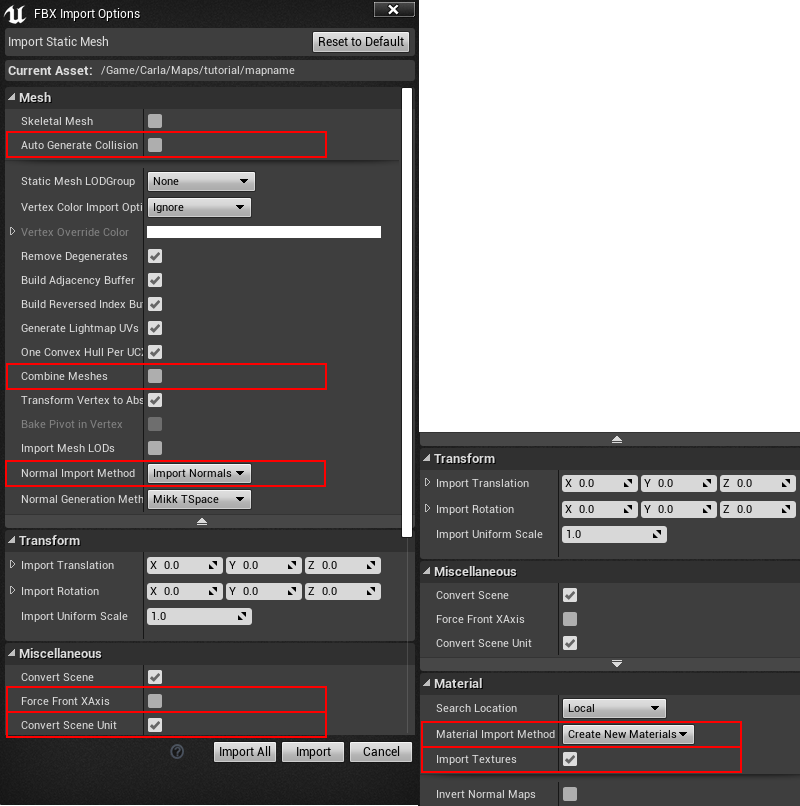
Import the mapname.fbx file to a new folder under
/Content/Carla/Mapswith theImportbutton. Make sure the following options are unchecked:- Auto Generate Collision
- Combine Meshes
- Force Front xAxis
- Normal Import Method - Import Normals
-
Check the following options:
- Convert Scene Unit
- If you want to import materials and textures:
- Material Import Method - Create new materials
- Import Textures
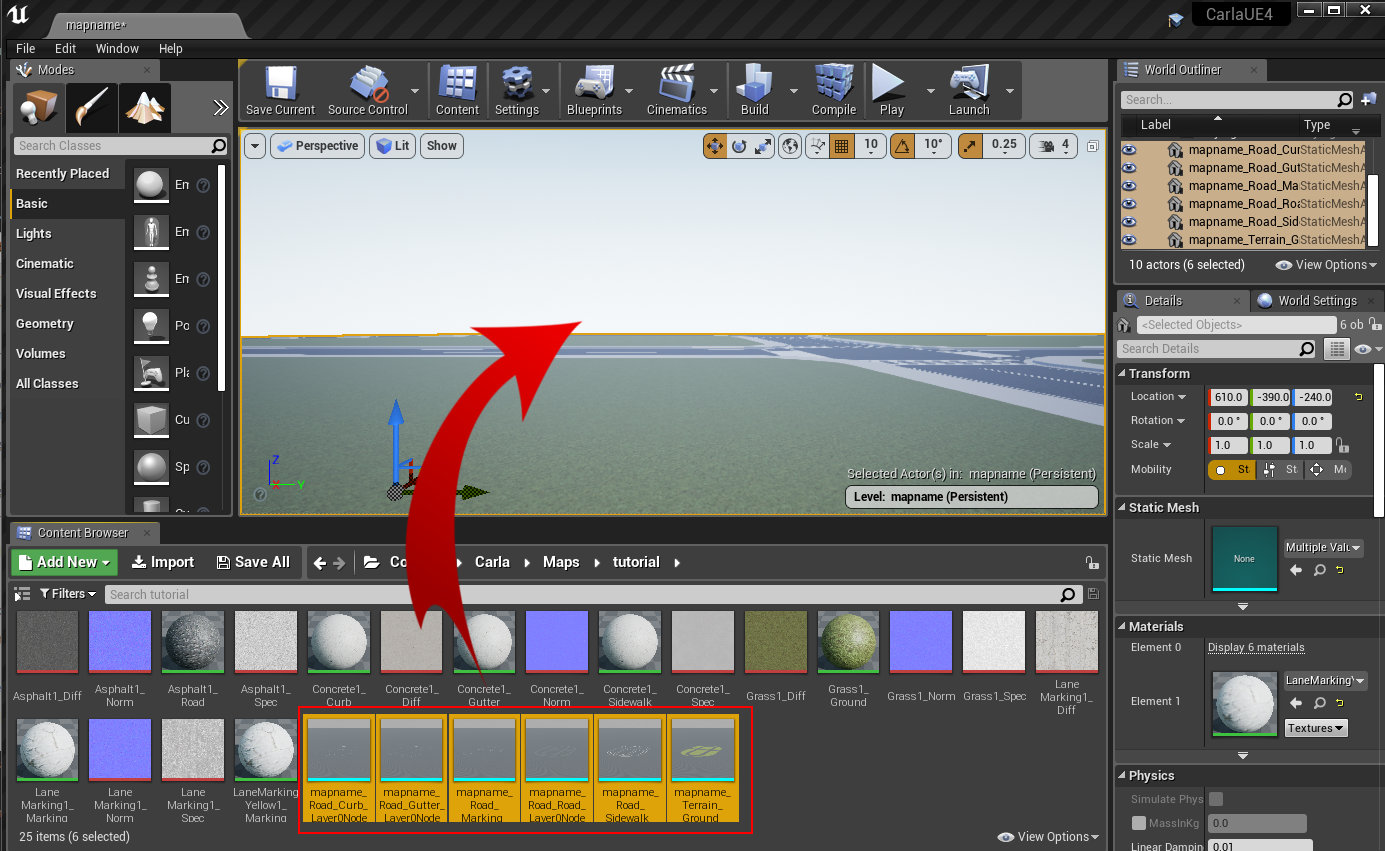
Once everything is loaded up, you should end with several static Meshes in the folder you have selected.
-
Drag them all into the level.
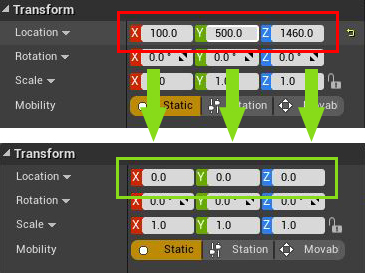
-
When Unreal Engine finishes loading, center the meshes at point (0, 0, 0) and you will have your map in Unreal! Congratulations!
-
Generate collisions, so pedestrians and vehicles don't fall into the abyss.
- Select the meshes that will have collision.
- Right-click
Asset Actions > Bulk Edit via Property Matrix....
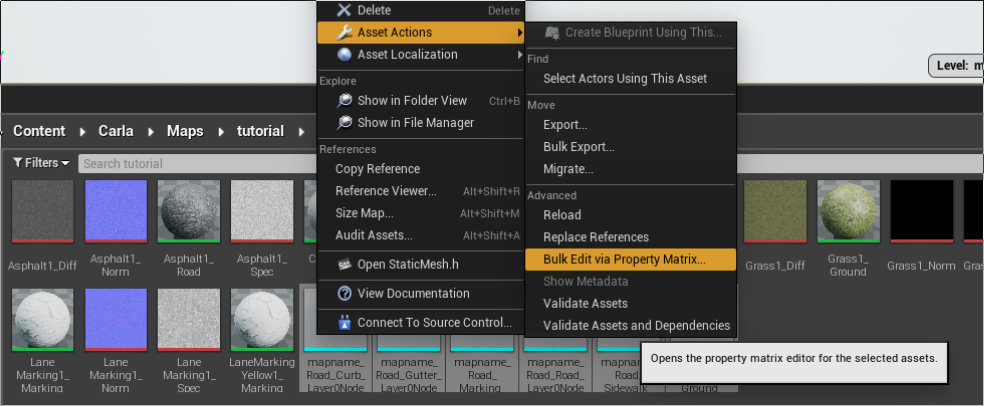
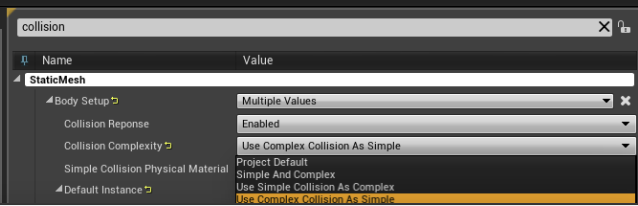
- Search for collision in Property's Matrix search box.
- Change
Collision complexityfromProject DefaulttoUse Complex Collision As Simple.
- Go to
File > Save All.
-
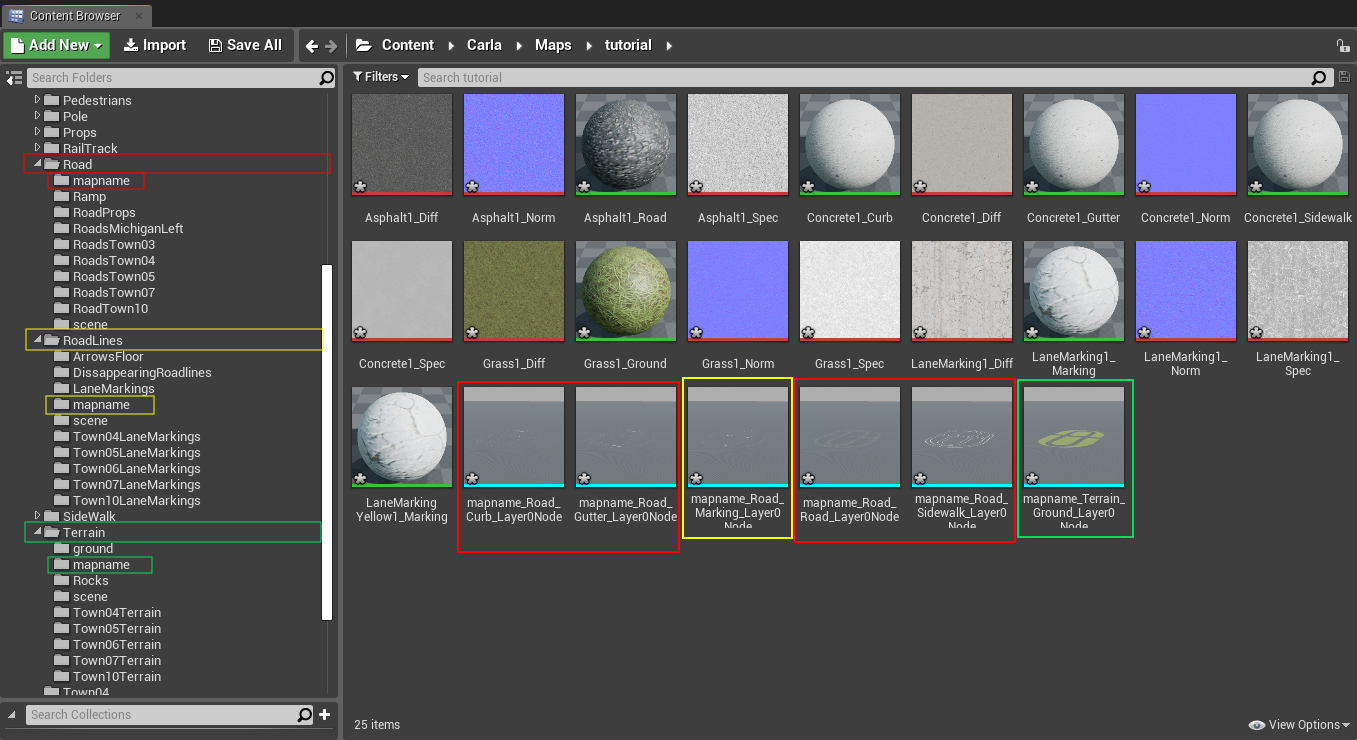
Lastly, for the semantic segmentation ground truth, move the static meshes imported under
Content/Carla/Maps/mapfoldertoCarla/Staticsubsequent folders:Terrain/mapnameRoad/mapnameRoadLines/mapname
Content
└── Carla
    ├── Blueprints
    ├── Config
    ├── Exported Maps
    ├── HDMaps
    ├── Maps
    └── Static
        ├── Terrain
        │   └── mapname
        │       └── Static Meshes
        │
        ├── Road
        │   └── mapname
        │       └── Static Meshes
        │
        └── RoadLines
            └── mapname
                └── Static Meshes
3.2.2 OpenDRIVE (.xodr)
- Copy the
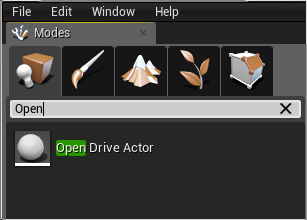
.xodrfile inside theContent/Carla/Maps/OpenDrivefolder. - Open the Unreal level and drag the Open Drive Actor inside the level. It will read the level's name, search the Opendrive file with the same name and load it.
And that's it! Now the road network information is loaded into the map.
4. Setting up traffic behavior
Once everything is loaded into the level, it is time to create traffic behavior.
- Click on the Open Drive Actor.
- Check the following boxes in the same order:
- Add Spawners
- (Optional) On Intersections (For more spawn points)
- Generate Routes
This will generate a bunch of RoutePlanner and VehicleSpawnPoint actors that make it possible for vehicles to spawn and go in autopilot mode.
4.1 Traffic lights and signs
To regulate the traffic, traffic lights and signs must be placed all over the map.
-
Drag traffic light / sign actors into the level and place them.
-
Adjust the
trigger boxof each traffic light / sign until it covers the road it affects.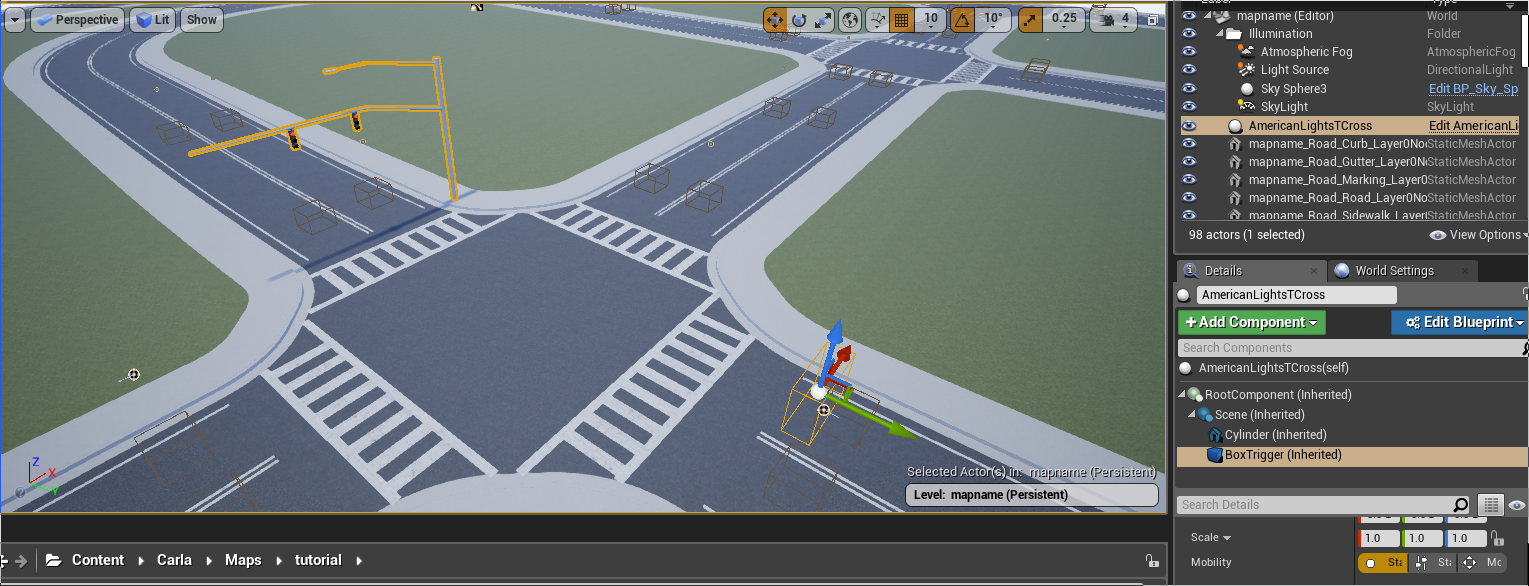
-
For traffic lights in junctions, drag a traffic light group actor into the level and assign all traffic lights involved.
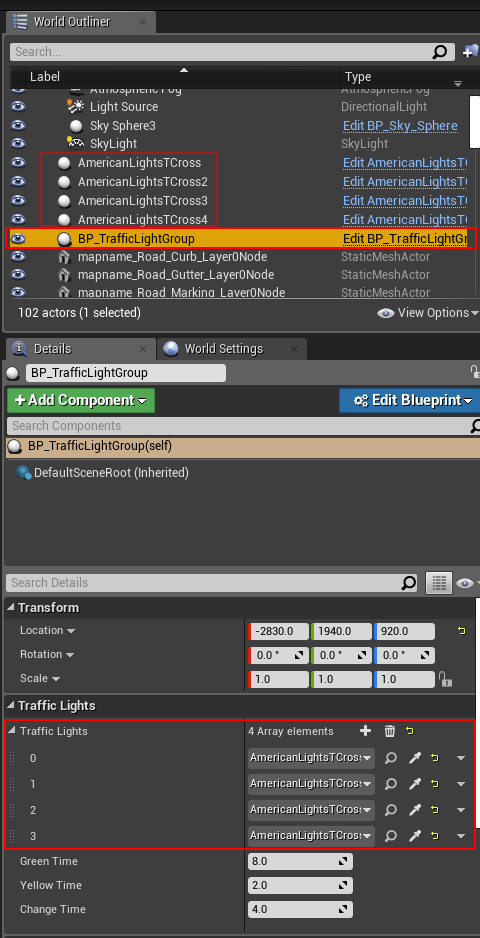
These last steps may require some trial and error. Traffic light timing and traffic trigger boxes might need some tweaking and testing to fit perfectly into the city.
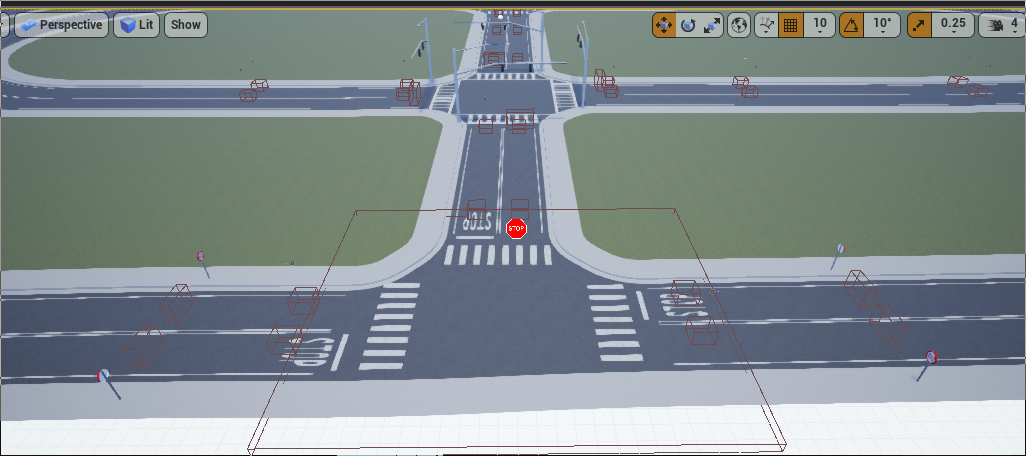
Example: Traffic Signs, Traffic lights and Turn based stop.
5 Adding pedestrian navigation areas
To make a navigable mesh for pedestrians, we use the Recast & Detour library.
https://github.com/recastnavigation/recastnavigation.
-
Clone or download Recast & Detour.
-
Before building RecastDemo you need to change
m_scalevariable from1.0fto0.01fin the MeshLoaderObj contructor inRecastDemo/Source/MeshLoaderObj.cpp.
rcMeshLoaderObj::rcMeshLoaderObj() :
    m_scale(0.01f),
    m_verts(0),
    m_tris(0),
    m_normals(0),
    m_vertCount(0),
    m_triCount(0)
{
}
Then build RecastDemo. Follow their instructions on how to build it.
Back to Unreal Engine
-
Select the meshes you want the pedestrians to be able to spawn and walk on.
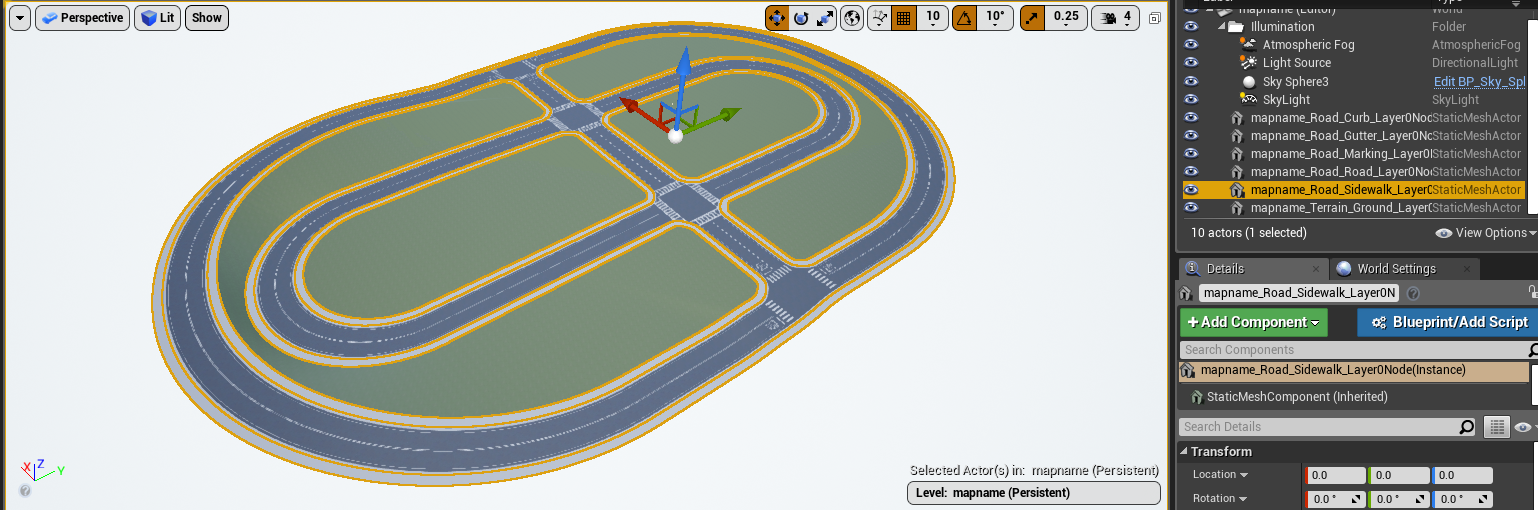
-
Export and save them as a
mapname.objfile.File > Export Selected.... -
Run RecastDemo
./RecastDemo.- Select
Solo Meshfrom theSampleparameter's box. -
Select the mapname.obj file from the
Input Meshparameter's box.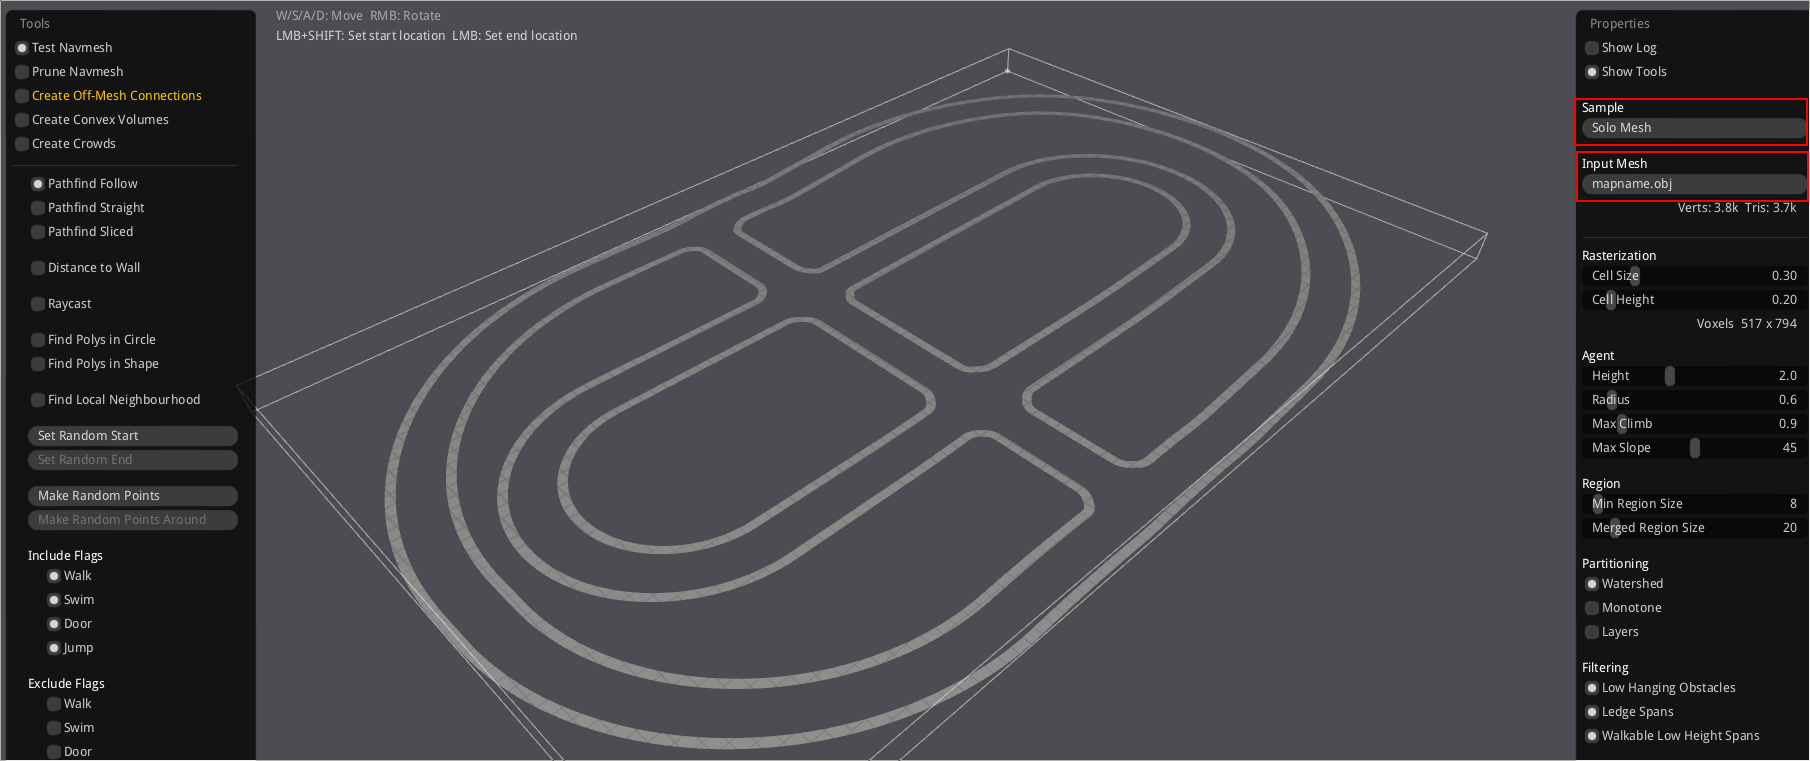
- Select
-
First click on the
Buildbutton, then once the built has finished, click on theSavebutton. - Change the filename of the binary file generated at
RecastDemo/Bintomapname.bin. - Drag the mapname.bin file into the
Navfolder underContent/Carla/Maps.
Now pedestrians will be able to spawn randomly and walk on the selected meshes!
Tips and Tricks
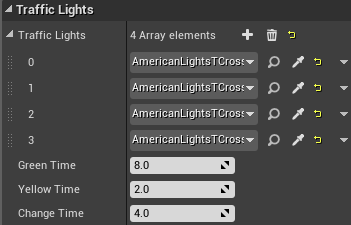
- Traffic light group controls wich traffic light is active (green state) at each moment.
You can configure the timing that the lights stay in green
GreenTime, the time it stays yellowYellowTime, and the time it takes between one traffic light goes red and the next one goes greenChangeTime.
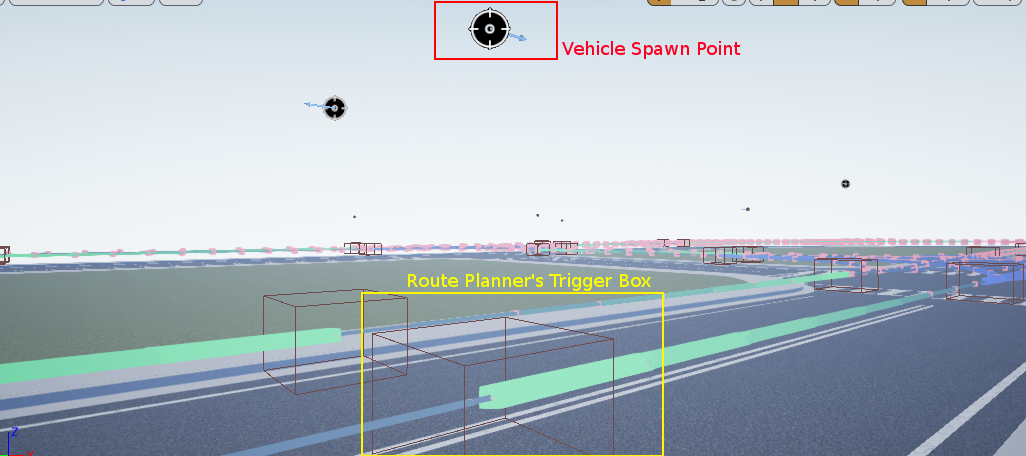
- You can add a vehicle spawn point. This should be placed 2 to 3 meters above a Route Planner's trigger box and oriented as the route shows. When the vehicle falls, it will hit the trigger box and the autopilot will take control of the vehicle.
-
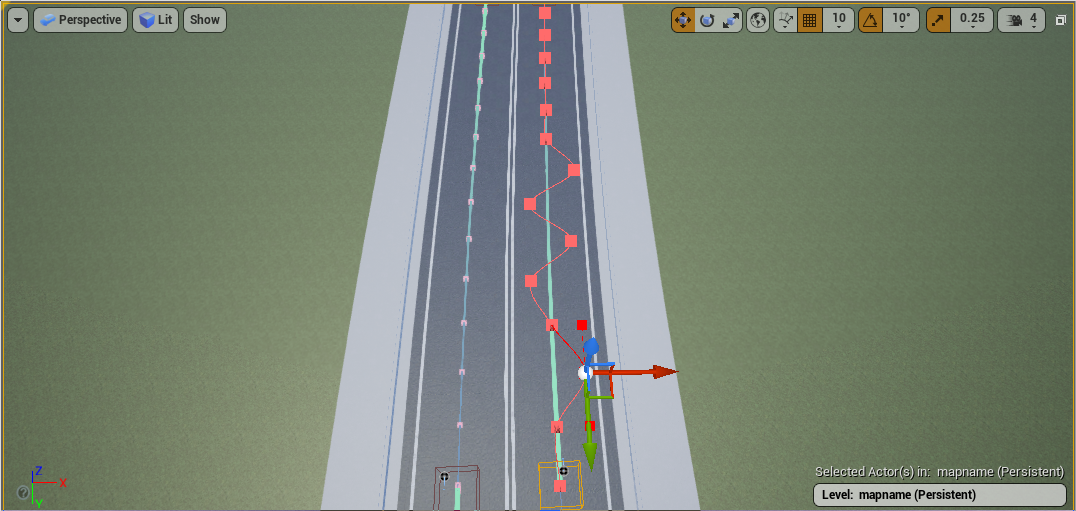
When you check
Generate Routesin Open Drive Actor, it generates the road network but it won't show individual planners. In order to show those points, please do the following:- Select all
RoutePlanneractors. - Move them.
- Press
ctr + zand they will show up on the map.
- Select all
-
OpenDRIVE routes can be manually modified.
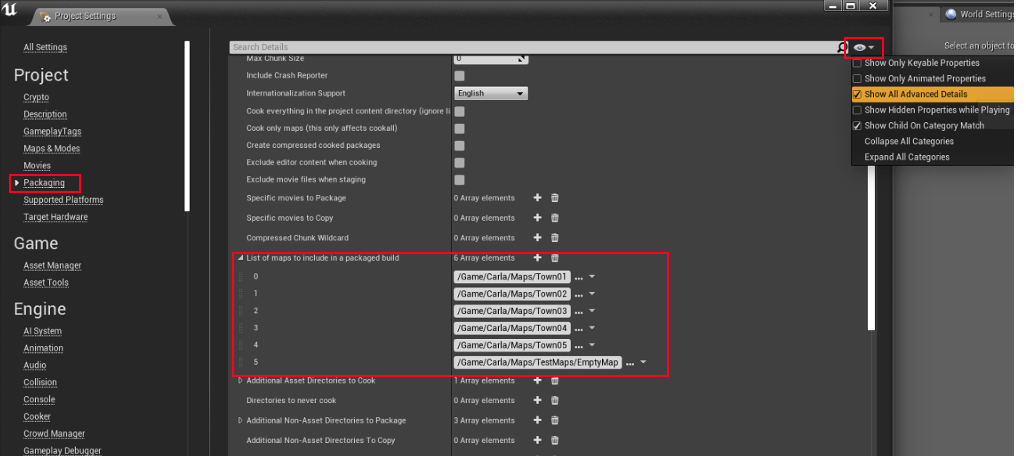
- In order to add the map to the Unreal packaging system, go to:
Edit > Project Settings > Project > Packaging > Show Advanced > List of maps to include...
Then add the level to the array.
- To change default materials and use the ones that come with CARLA at:
Content/Carla/Static/GenericMaterials.- Unreal shortcuts to find materials and assets:
Right-click on the Asset > Browse to AssetRight-click on the Material > Asset Actions > Select Actors Using This Asset
- Unreal shortcuts to find materials and assets: