How to make a new map with RoadRunner
RoadRunner
RoadRunner is a powerful software from Vector Zero to create 3D scenes. Using RoadRunner is easy, in a few steps you will be able to create an impressive scene. You can download a trial of RoadRunner at:
Step 1 - Create your map in RoadRunner:
- Start by becoming familiar with the RoadRunner editor. Play with the controllers to define roads, sidewalks, etc. Please, keep in mind the following rules:
- Create your maps centered arround (0,0). This is required to maintain compatibility with CARLA maps.
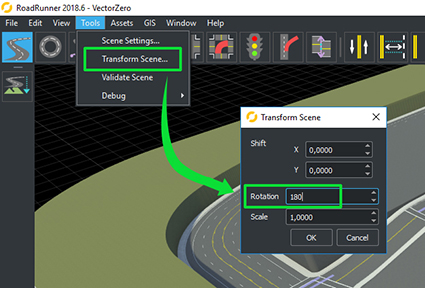
- At the beginning of the map creation select Tools/TransformScene and aply a 180º rotation. Currently OpenDrive appears rotated 180 degrees by default --We are working on fixing that.
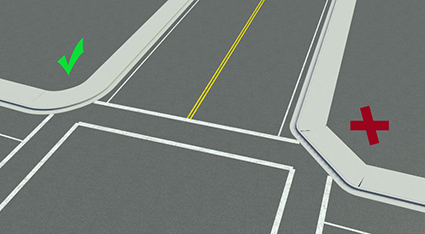
- Check that all conections and geometries seem correct.
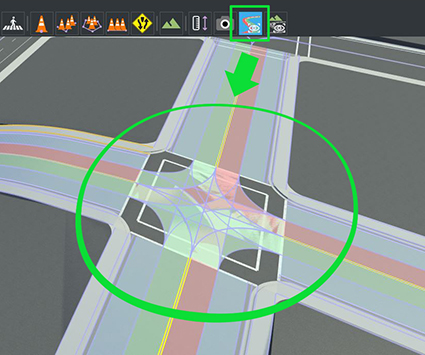
- Visualize the OpenDrive road network by clicking on the "OpenDrivePrevewTool" button.
Note
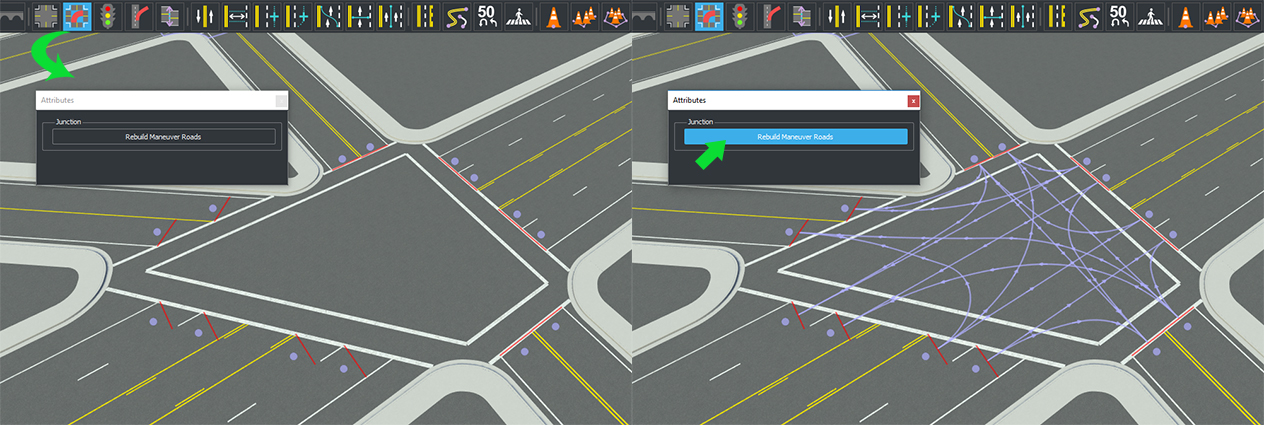
During the creation of the map, junctions (the union between two roads) might yield some errors when building the OpenDrive file. Clicking on the "OpenDrivePreviewTool" button lets you test the integrity of the current map. If errors happen you shoud click on the "ManouverRoadsTool" button and then within the details window, under junction, click on the "RebuildManouverRoads" button. Even if nothing seems to happen the road should be fixed.
Exporting:
After verifying that everything is correct it is time to export the map to Unreal. You need export two files to create a map in Unreal.
-
OpendDrive (.xodr) Information that cars need to circulate on the map.
-
Binaries (.fbx) All meshes you need to build the map, i.e., roads, lanemarking, sidewalk, ect.
In order to export these files you need to follow these steps:
- Select File - Export - OpenDrive (.xodr)
- Select File - Export - Filmbox (.fbx)
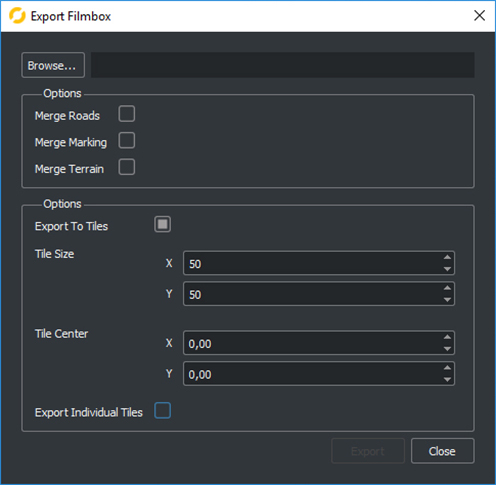
- Choose your export folder and Keep Merge Roads, Merge Marking and Merge Terrain Unchecked.
-
Under Options Check "ExportToTiles" to divide the map into chunks, this keeps the render process a bit lighter. Be carefull though, subdividing the map too much will also be inefficient. Some experimentation is needed here to get the perfect point and it will depend on the map beeing created.
-
Leave "Export individual Tiles" Unchecked, this will give you only one fbx file with all the pieces, making easier to keep track of the map.
Step 2 - Unreal
Importing into Unreal:
- Start dragging your file from where it is saved to the "content browser" in your unreal's project as you would do with any other asset.
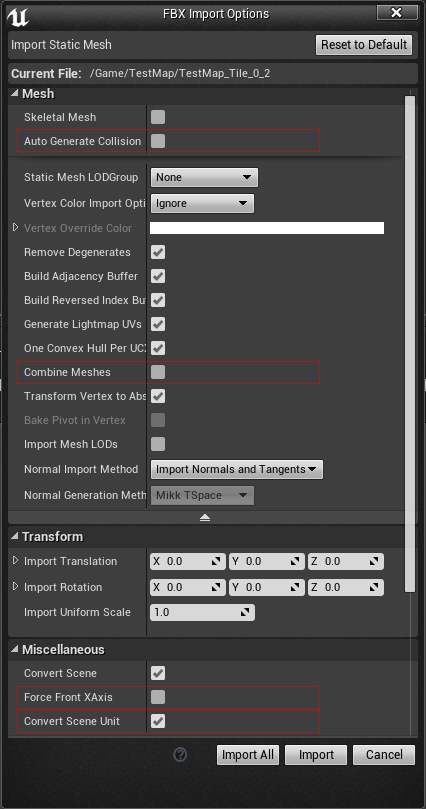
- In the Import window make sure the following options are unchecked: ForcefrontXAxis, Autogenerate collission, combine meshes.
- Make sure that ConvertSceneUnit is checked.
- You should Also check "Import Materials" and "Import Textures" if you want to use RoadRunner materials or use the method described at the end of the next step to change them in batches.
Working with maps in Unreal:
First of all create a level with the Map name (this will be important later) and save it inside Game/Carla/Maps/
Once everything is loaded up you should end with several staticMeshes in the folder you have selected. Drag them all to the level and you will have your map in Unreal! Congratulations!.
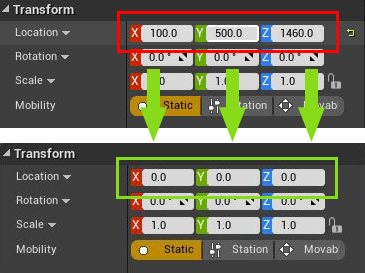
The time taken by the loading process will depend on how many pieces you cut the map into. Be patient! All the pieces share the same center pivot, so if they are positioned in the same place they should fit as they did in the RoadRunner Editor. When unreal finish loading the meshes must be centered at point (0, 0, 0).
Semantic Segmentation Ground Truth
Once you have loaded the correct map and materials, we will prepare the semantic segmantation ground truth. In order for the semantic segmentation to work, you will need to save the different pieces of the map in their corresponding folder. This is a bit difficult today as with the current version there is no name identification for the different pieces but this is a just temporal issue from Roadrunner side. Typically you will need only 3 Folders: ../Content/Static/ 1- Road, 2-Terrain, 3- RoadLines.
How to put meshes in the right folder
Select the material of the items you want to change into a new folder. Importing the assets creates a road material, a sidewalk material and so on.
-
Once selected rightclick and select "Asset Actions/Select actors Using this asset". All actors using that material should be highlighted in the viewport.
-
Rightclick on them in the world and select "Browse to asset". All assets using the first material you have chosen should be selected in the Content browser.
-
Move them all to the corresponding folder and repeat for each category until every road asset is clasified.
Roadrunner roads come with premade materials, but for CARLA weather to work properly you will need to change the pavement materials to some of our own (Stored under Carla/Static/GenericMaterials/WetPavement). To this end you can change the materials one by one or you could remove the Roadrunner materials. This action will trigger the replace references window in which you can select and change the new material for the meshes the last one was referencing.
Step 3 - Loading OpenDrive into CARLA
-
In RoadRunner go into File/Export and choose OpenDrive(.xodr). In the Export window choose the save folder and name the file with the same name as the map. Let everything else with the default values and press export.
-
Copy the .xodr file inside the Content/Carla/Maps/OpenDrive folder.
-
Open Your Unreal level and drag the OpenDriveActor inside the scene. This will read the level name, search the Opendrive file with the same name and load it.
-
If everything goes right you should have your road information loaded into your map. Congratulations!
Note
It is possible that the map that Opendrive generates is rotated. Maybe you did not rotate it in RoadRunner when you told you so? If this happens you only need to select all map import from RoadRunner and rotate Z: by 180 degrees.
Setting up the traffic based on OpenDrive:
Note
the current version of CARLA needs a CarlaMapGenerator spawned in order to use the server autopilot functionality. From the current version it is also to drive all vehicles using the new client nvaigation stack. However, if you still want to use the server autopilot you will need to create a CarlaMapGenerator for your city --never above or under it.
-
You will need to place points for the vehicles to spawn. The actor that sets the spawn position of the vehicles is called VehicleSpawnPoint. CARLA vehicles must overlap with one of the RoutePlanner's trigger box for them to be directed, otherwise they would drive straight until they find an obstacle. We suggest placing the spawners 2 to 3 meters avobe each trigger box, not much higher as if the spawn is too high it is not able to measure if there is any vehicle under it before spawning and they would end up spawning on top of each other. Spawning the vehicles a few meters behind the trigger boxes would also work but that is a bit trickier.
-
Spawners must always be oriented as the road dictates. This must be done by hand but we will make some form of automation in the future.
-
Traffic lights must be placed in every crossing in whitch vehicles might conflict. theese are the childs of "TrafficLightBase" and are stored inside Game/Carla/Static/TrafficSigns/Streetlights_01.
Again, remember this is just needed to use the server autopilot. We recommend to start using new the client driving stack provided from 0.9.2 version.
Working with BP_TrafficLight and BP_TrafficLightGroups:
-
One trafficlight must be placed at every entrance that needs regulation. One TrafficLightGroup must be placed in every crossing that has street lights. Adjust The triggerbox of each traffic light until it covers the roads it affects.
-
Once the actors of an Intersection are placed, open the corresponding group and under TrafficLights store all TrafficLight actors involved.
-
Trafficlight group works by Rotating whitch of the involved traffic light is green each moment. You can configure the timing the Lights stays in green (GreenTime), the time it stays yellow (YellowTime), and the time it takes between one trafficlight goes red and the next one goes green (ChangeTime).
-
These last steps are in an early stage and may require a some trial and error from users. VehicleSpawner placement, Street light timing and Traffic light StopperBoxes might need some tweaking and testing to fit perfectly into the built city.