Map customization
This document is a work in progress and might be incomplete.
Creating a new map
Bug
Creating a map from scratch with the Carla tools causes a crash with UE4.17.2 (Issue #99), this guide will suggest duplicating an existing level instead of creating one from scratch.
Requirements
Creating
- Duplicate an existing map
- Remove everything you don't need from the map
- Keep the folder "Lighting", "AtmosphericFog", "PostProcessVol" and "CarlaMapGenerator" this will keep the climate working as intended and the post process saved.
- It might be interesting to keep the empty level as a template and duplicate it before starting to populate it.
- In the CarlaMapGenerator, there is a field "seed". You can change the map by altering that seed and clicking "Trigger Road Map Generation". "Save Road Map To Disk" should also be checked.
- You can change the seed until you have a map you are satisfied with.
- After that you can place new PlayerStarts at the places you want the cars to be spawned.
-
The AI already works, but the cars won't act randomly. Vehicles will follow the instructions given by the RoadMapGenerator. They will follow the road easily while in straight roads but wont so much when entering Intersections:
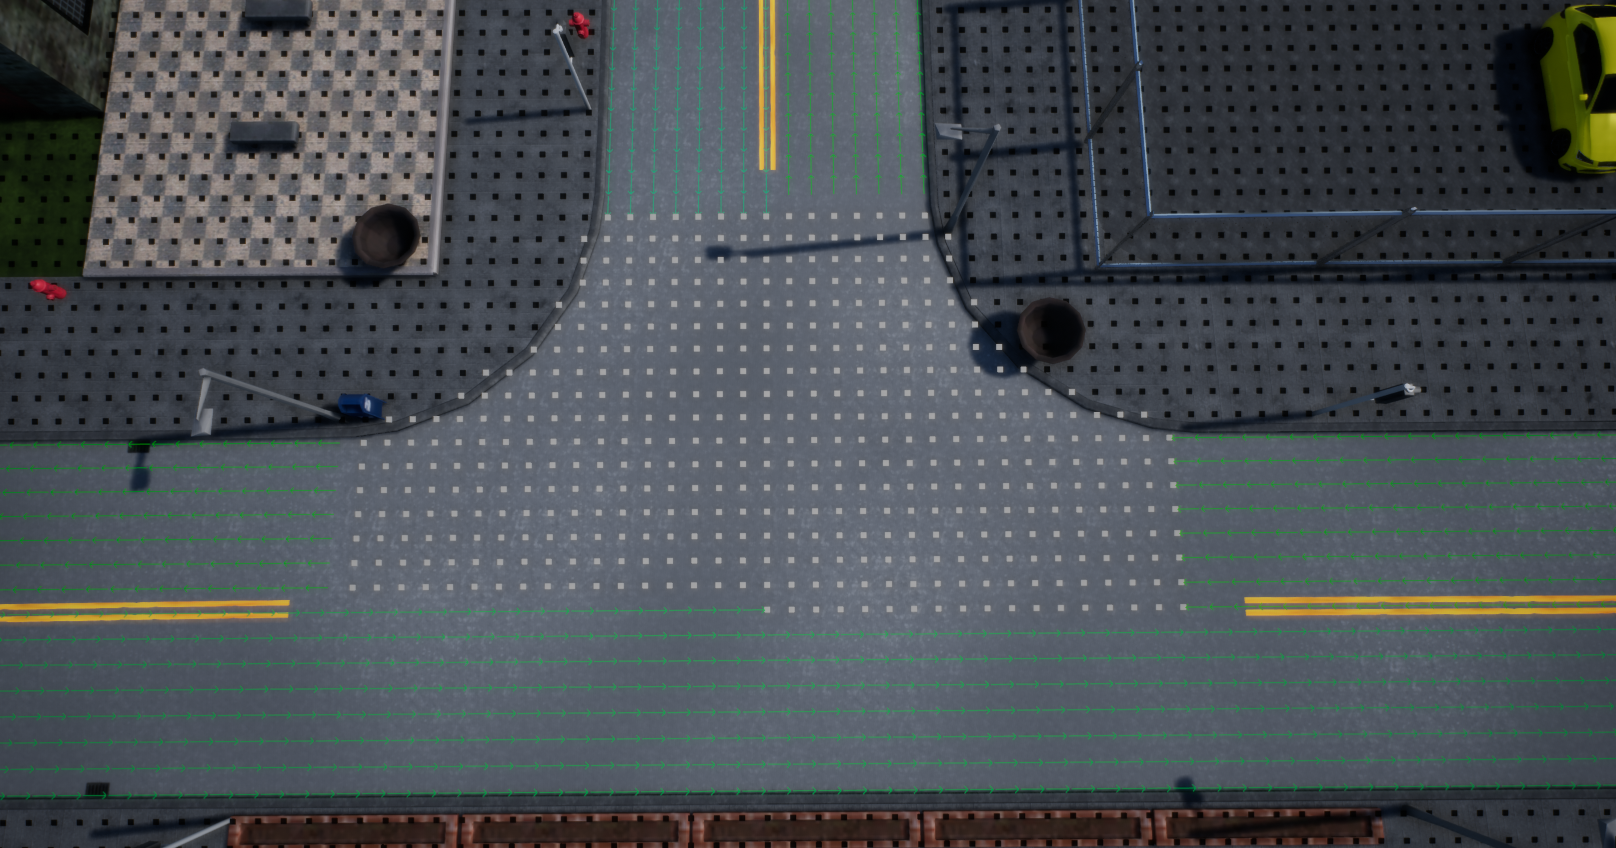
(This is a debug view of the instructions the road gives to the Vehicle. They will always follow the green arrows, the white points are shared points between one or more routes, by default they order the vehicle to continue straight; Black points are off the road, the vehicle gets no instructions and drives to the left, trying to get back to the road)
-
To get a random behavior, you have to place IntersectionEntrances, this will let you redefine the direction the vehicle will take overwriting the directions given by the road map (until they finish their given order). (See the two example towns how it exactly works).
- Before version 0.7.1: For every entrance you'll have to create a series of empty actors that will be the waypoints to guide the car through the intersection; Then you'll have to assign the corresponding actors to every Path
- After version 0.7.1: Every IntersectionEntrance has an array called routes, adding an element to this creates an editable spline in the world with the first point on the IntersectionEntrance (You might have to select another object before you can see it) This spline defines the possible routes any car will take when entering the intersection (as the Empty actors did before) you might configure this routes as you would edit any Unreal spline. Each route will create an element in the field bellow: "Probabilities" every number in this array defines the chances of any vehicle to take the corresponding route.
- To change the speed of the car, use the SpeedLimiters. They are straightforward to use. (Make sure you limit the speed for the corners, otherwise the cars will try and fail to take them at full speed)
- Traffic lights need to be scripted to avoid traffic accidents. Every street at a crossing should have its own turn at green without the other streets having green.
- Then you can populate the world with landscape and buildings.
MultipleFloorBuilding
The purpose of this blueprint is to make repeating and varying tall buildings a bit easier. Provided a Base, a MiddleFloor and a roof; this blueprint repeats the middle floor to the desired number of stores and tops it with the last floor given some conditions:
- All model pivots should be in the bottom center of the Specific mesh.
- Al models must start and end exactly where the repetition happen.
This blueprint is controlled by this 6 specific Parameters:
- GroundFloor: The mesh to be placed in the base of the building.
- Floor: The mesh to be repeated along the building.
- Roof: Final mesh to top the building.
- FloorNumber: Number of stores of the building.
- FloorHeightOffset: Adjust The placement of every floor vertically.
- RoofOffset: Adjust the placement of the roof vertically.
All of This parameters can be modified once this blueprint is placed in the world.
SplinemeshRepeater
Standard use:
SplineMeshRepeater "Content/Blueprints/SplineMeshRepeater" is a tool included in the Carla Project to help building urban environments; It repeats and aligns a specific chosen mesh along a Spline (Unreal Component). Its principal function is to build Typically tiled and repetitive structures as Walls, Roads, Bridges, Fences... Once the actor is placed into the world the spline can be modified so the object gets the desired form. Each Point Defining the spline Generates a new tile so that as more points the Spline has, the more defined it will be, but also heavier on the world. This actor is defined by the following parameters:
- StaticMesh: The mesh to be repeated along the spline.
- ForWardAxis: Changes the mesh axis to be aligned with the spline.
- Material: Overrides the mesh' default material.
- Collision Enabled: Chooses the type of collision to use.
- Gap distance: Places a Gap between each repeated mesh, for repetitive non continuous walls: bush chains, bollards...
(Last three variables are specific for some particular assets to be defined in the next point) A requisite to create assets compatibles with this component is that all the meshes have their pivot placed wherever the repetition starts in the lower point possible with the rest of the mesh pointing positive (Preferably by the X axis)
Specific Walls (Dynamic material)
In the project folder "Content/Static/Walls" are included some specific assets to be used with this SplineMeshRepeater with a series of special characteristics. The UV space of this meshes and their materials are the same for all of them, making them exchangeable. each material is composed of three different surfaces the last three parameters slightly modify the color of this surfaces:
- MainMaterialColor: Change the main material of the Wall
- DetailsColor: Change the color of the details (if any)
- TopWallColor: Change the color of the wall cover (if any)
To add elements that profit from this functions exist the GardenWallMask File that defines the uv space to place the materials: (Blue space: MainMaterial; green space: Details; red space TopWall).
Between the material masters is WallMaster which is going to be the master of the materials using this function. An instance of this material will be created and the correspondent textures will be added. This material includes the following parameters to be modified by the material to use:
- Normal Flattener: Slightly modifies the normal map values to exaggerate it or flatten it.
- RoughnessCorrection: Changes the Roughness value given by the texture.
The rest of the parameters are the mask the textures and the color corrections that won't be modified in this instance but in the blueprint that will be launched into the world.
Weather
This is the actor in charge of modifying all the lighting, environmental actors an anything that affects the impression of the climate. It runs automatically with the game when is not specified otherwise In the Config. Ini but has Its own actor to launch in editor mode to configure the climatic conditions. To fully work It will need One of each of the following actors: SkySphere, Skylight, Postprocess Volume (Boundless) And Light Source to exist in the world.
- SunPolarAngle: polar angle of the sun, determines time of the day
- SunAzimuthAngle: adds to the location of the sun in the current level
- SunBrightness: Brightness of the rendering of the sun in the skybox
- SunDirectionalLightIntensity: Intensity of the sunlight
- SunDirectionalLightColor: Color of the sunlight
- SunIndirectLightIntensity: intensity of the bounces of the main light
- CloudOpacity: visibility of the cloud rendering on the skybox
- HorizontFalloff: determines the height of the gradient between the zenith and horizon color
- ZenithColor: Defines the color of the zenith.
- HorizonColor: Defines the color of the horizon.
- CloudColor: Defines the color of the Clouds, if any.
- OverallSkyColor: multiplies every colored element in the sky by a single color.
- SkyLightIntensity: Intensity of the light bounced from the sky.
- SkyLightColor: Color of the light bounced from the sky.
- Precipitation: Defines if any precipitation is active.
- PrecipitationType: the type of precipitation to active.
- PrecipitationAmount: the quantity of the chosen precipitation.
- PrecipitationAccumulation: the accumulation of the chosen precipitation.
- bWind: defines if there is any wind.
- WindIntensity: defines the wind intensity.
- WindAngle: defines the wind direction.
- bOverrideCameraPostProcessParameters: Defines if the default camera postprocess is overwritten.
- CameraPostProcessParameters.AutoExposureMethod: Defines the method of autoexposure.
- CameraPostProcessParameters.AutoExposureMinBrightness: defines the minimum brightness the autoexposure will count as right in the final image.
- CameraPostProcessParameters.AutoExposureMaxBrightness: defines the maximum brightness the autoexposure will count as right in the final image.
- CameraPostProcessParameters.AutoExposureBias: Darkens or brightens the final image towards a defined bias.
You can have as many different configurations saved in the project as you want and choose the configuration to apply while on the build, through the settings file; or in the editor while building the level or testing.