Add a new vehicle
This tutorial details how to add a new vehicle to CARLA. There are two sections, one for 4 wheeled vehicles and one for 2 wheeled vehicles. There is an outline of the basic requirements that must be fulfilled when modeling your vehicle to ensure that it works well in CARLA and instructions on configurations required after the vehicle has been imported into Unreal Engine.
Important
This tutorial only applies to users that work with a build from source, and have access to the Unreal Engine Editor.
Add a 4 wheeled vehicle
Vehicles added to CARLA need to use a common base skeleton which is found here. This link will download a folder called VehicleSkeleton.rar which contains the base skeleton in two different .fbx formats, one in ASCII and the other in binary. The format you use will depend on your 3D modeling software requirements.
__The positions of the skeleton bones can be changed but any other manipulation such as rotation, addition of new bones, or changing the current hierarchy will lead to errors. __
Bind and model the vehicle
This section details the minimum requirements in the modeling stage of your vehicle to make sure it can be used successfully in CARLA. The process involves binding the skeleton correctly to the base and wheels of the vehicle, creating Physical Asset and raycast sensor meshes, and exporting to the correct format.
1. Import the base skeleton.
Import the base skeleton into your preferred 3D modeling software. Common editors include Maya and Blender.
2. Bind the bones.
Bind the bones to the corresponding portions of the vehicle mesh according to the nomenclature below. Make sure to center the wheels' bones within the mesh.
- Front left wheel:
Wheel_Front_Left - Front right wheel:
Wheel_Front_Right - Rear left wheel:
Wheel_Rear_Left - Rear right wheel:
Wheel_Rear_Right - Rest of the mesh:
VehicleBase
Warning
Do not make any changes to the bone names or the hierarchy nor add any new bones.
3. Model your vehicle.
Vehicles should have between approximately 50,000 - 100,000 tris. We model the vehicles using the size and scale of actual cars.
We recommend that you divide the vehicle into the following materials:
- Bodywork: The metallic part of the vehicle. This material is changed to Unreal Engine material. Logos and details can be added but, to be visible, they must be painted in a different color by using the alpha channels in the Unreal Engine editor.
- Glass_Ext: A layer of glass that allows visibility from the outside to the inside of the vehicle.
- Glass_Int: A layer of glass that allows visibility from the inside to the outside of the vehicle.
- Lights: Headlights, indicator lights, etc.
- LightGlass_Ext: A layer of glass that allows visibility from the outside to the inside of the light.
- LightGlass_Int: A layer of glass that allows visibility from the inside to the outside of the light.
- LicensePlate: A rectangular plane of 29x12 cm. You can use the CARLA provided
.fbxfor best results, download it here. The texture will be assigned automatically in Unreal Engine.- Interior: Any other details that don't fit in the above sections can go into Interior.
Materials should be named using the format M_CarPart_CarName, e.g., M_Bodywork_Mustang.
Textures should be named using the format T_CarPart_CarName, e.g., T_Bodywork_Mustang. Textures should be sized as 2048x2048.
Unreal Engine automatically creates LODs but you can also create them manually in your 3D editor. Tri counts are as follows:
- LOD 0: 100,000 tris
- LOD 1: 80,000 tris
- LOD 2: 60,000 tris
- LOD 3: 30,000 tris
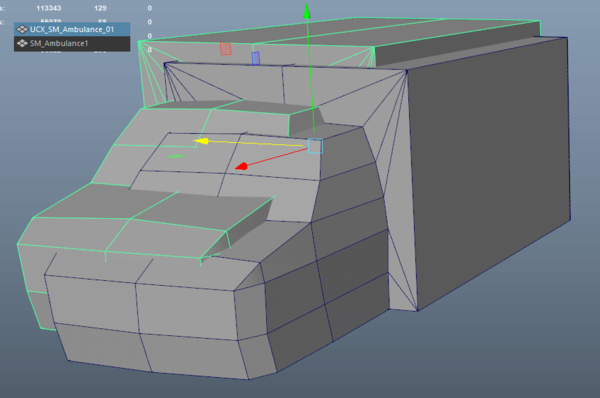
4. Create the Physical Asset mesh.
The Physical Asset mesh is an additional mesh that allows Unreal Engine to calculate the vehicle's physics. It should be as simple as possible, with a reduced number of polygons, and should cover the whole vehicle except for the wheels. See the image below for an example.
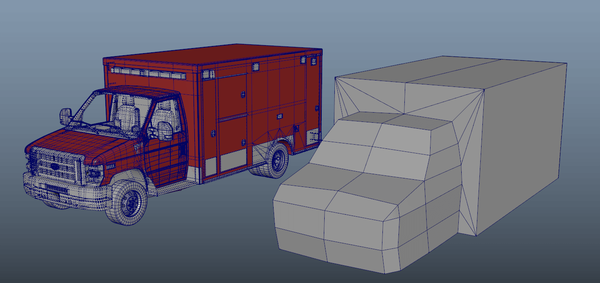
The Physical Asset mesh should be exported as a separate .fbx file. The final file should fulfill the following requirements:
- Have a base mesh. This should be a copy of the Physical Asset mesh. It should have the same name as the original vehicle.
- The Physical Asset mesh must be named using the format
UCX_<vehicle_name>_<number_of_mesh>, otherwise it will not be recognized by Unreal Engine. - The mesh must not extend beyond the boundaries of the original model.
- The mesh should have the same position as the original model.
Export the final mesh as an .fbx file with the name SMC_<vehicle_name>.fbx.
5. Create the mesh for the raycast sensor.
The raycast sensor mesh sets up the vehicle's shape that will be detected by the raycast sensors (RADAR, LiDAR, and Semantic LiDAR). This mesh should have a slightly more defined geometry than the Physical Asset mesh in order to increase the realism of sensor simulation but not as detailed as the car mesh for performance reasons.
Consider the following points when creating the raycast sensor mesh:
- The mesh should cover all aspects of the vehicle, including wheels, side mirrors, and grilles.
- The wheels should be cylinders of no more than 16 loops.
- Various meshes can be joined together if required.
- The mesh(es) must not extend beyond the boundaries of the original model.
- The mesh(es) should have the same position as the original.
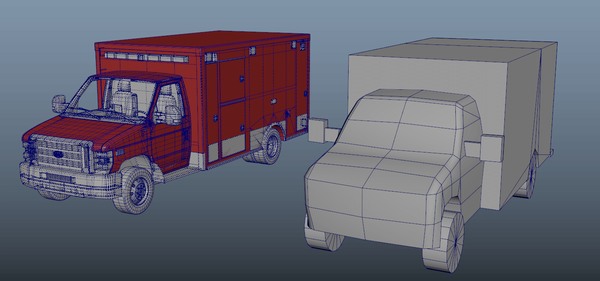
Export the final mesh as an .fbx file with the name SM_sc_<vehicle_name>.fbx.
5. Export the vehicle mesh(es).
Select all the main vehicle mesh(es) and the skeleton base and export as .fbx.
Import and configure the vehicle
This section details the process of importing the vehicle into Unreal Engine for use in CARLA. Perform these steps in the Unreal Engine editor.
1. Create the vehicle folder.
Create a new folder named <vehicle_name> in Content/Carla/Static/Vehicles/4Wheeled.
2. Import the .fbx.
Inside the new vehicle folder, import your main vehicle skeleton .fbx by right-clicking in the Content Browser and selecting Import into Game/Carla/Static/Vehicles/4Wheeled/<vehicle_name>.
In the dialogue box that pops up:
- Set Import Content Type to
Geometry and Skinning Weights. - Set Normal Import Method to
Import Normals. - Optionally set Material Import Method to
Do not create materials. Uncheck Import Textures to avoid Unreal Engine creating default materials.
The Skeletal Mesh will appear along with two new files, <vehicle_name>_PhysicsAssets and <vehicle_name>_Skeleton.
Import the rest of your .fbx files separately from the main vehicle skeleton .fbx file.
3. Set the physical asset mesh.
- Open
<vehicle_name>_PhysicsAssetsfrom the Content Browser.- Right-click on the
Vehicle_Basemesh in the Skeleton Tree panel and go to Copy Collision from StaticMesh.- Search for and select your
SMC_<vehicle_name>file. You should see the outline of the physical asset mesh appear in the viewport.- Delete the default capsule shape from the
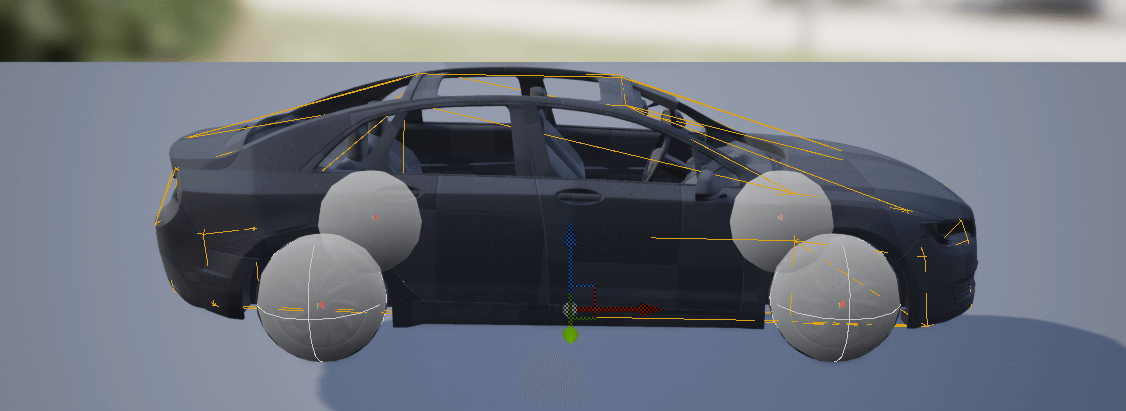
Vehicle_Base.- Select all the wheels:
- Go to the Tools panel and change the Primitive Type to
Sphere.- Go to the Details panel and change Physics Type to
Kinematic.- Set Linear Damping to
0. This will eliminate any extra friction on the wheels.- Enable Simulation Generates Hit Event for all meshes.
- Click Re-generate Bodies.
- Adjust the wheel sphere to the size of the wheel.
- Save and close the window.
4. Create the Animation Blueprint.
- In the Content Browser, right-click inside your vehicle folder and select Animation -> Animation Blueprint.
- In Parent Class search for and select
VehicleAnimInstance.- In Target Skeleton search for and select
<vehicle_name>_Skeleton.- Press OK and rename the blueprint as
AnimBP_<vehicle_name>.
5. Configure the Animation Blueprint.
To ease the process of configuring the animation blueprint, we will copy an existing one from a native CARLA vehicle:
- Go to
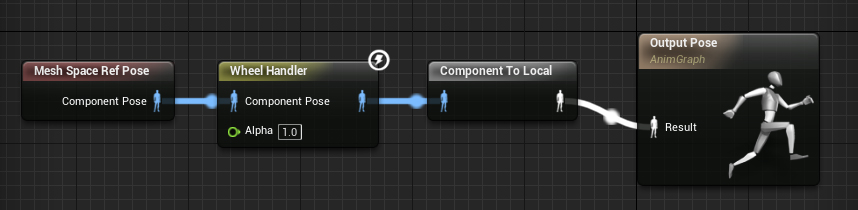
Content/Carla/Static/Vehicleand choose any CARLA vehicle folder. Open its Animation Blueprint.- In the My Blueprint panel, double click on AnimGraph. You will see the graph come up in the viewport.
- Click and drag to select the Mesh Space Ref Pose, Wheel Handler, and Component To Local components. Right-click and select Copy.
- Go back to your own vehicle Animation Blueprint and paste the copied contents into the graph area.
- Click and drag from the standing figure in the Component To Local component to the figure in Output Pose to join the components together.
- Click Compile in the top left corner. You should now see a pulsating line flowing through the entire sequence.
- Save and close the window.
6. Prepare the vehicle and wheel blueprints.
- In the Content Browser, go to
Content/Carla/Blueprints/Vehiclesand create a new folder<vehicle_name>.- Inside the folder, right-click and go to Blueprint Class. Open the All Classes section in the pop-up.
- Search for
BaseVehiclePawnand press Select.- Rename the file as
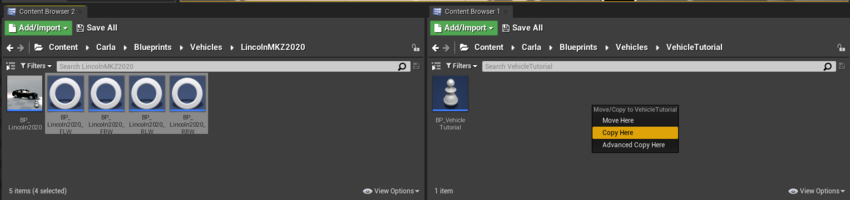
BP_<vehicle_name>.- Go to the folder of any of the native CARLA vehicles in
Carla/Blueprints/Vehicles. From the Content Browser, copy the four wheel blueprints into the blueprint folder for your own vehicle. Rename the files to replace the old vehicle name with your own vehicle name.
7. Configure the wheel blueprints.
- In your vehicle blueprint folder, open all four of the wheel blueprints.
- In the Class Defaults panel, set Collision Mesh to
Wheel_Shape. Omitting this step will cause the vehicle wheels to sink into the ground.- Adjust the values for wheel shape radius, width, mass, and damping rate according to your vehicle specifications.
- Set Tire Config to
CommonTireConfig- On the front wheels set Steer Angle according to your preferences (default is
70). Uncheck Affected by Handbrake.- On the rear wheels set Steer Angle to
0. Check Affected by Handbrake.- When setting the suspension values, you can use the values here as a guide.
- Compile and save.

8. Configure vehicle blueprint.
- From the Content Browser, open your
BP_<vehicle_name>.- In the Components panel, select Mesh (VehicleMesh) (Inherited).
- In the Details panel, go to Skeletal Mesh and search for and select the base skeleton file of your vehicle (located in the
Carla/Static/Vehicles/4Wheeled/<vehicle_name>folder).- Go to Anim Class in the Details panel. Search for and select your
AnimBP_<vehicle_name>file.- In the Components panel, select Custom Collision (Inherited).
- Select Static Mesh in the Details panel and search for your
SM_sc_<vehicle_name>raycast sensor mesh.- In the Components panel, select VehicleMovement (MovementComp) (Inherited).
- In the Details panel, search for
wheel. You will find settings for each of the wheels. For each one, click on Wheel Class and search for theBP_<vehicle_name>_<wheel_name>file that corresponds to the correct wheel position.
If you have any additional meshes for your vehicle (doors, lights, etc.,) separate from the base mesh:
- Drag them into the Mesh (VehicleMesh) (Inherited) hierarchy in the Components panel.
- Select the extra meshes in the hierarchy and search for
Collisionin the Details panel.- Set Collision Presets to
NoCollision.- Select any lights meshes in the hierarchy. Search for
Tagin the Details panel and add the tagemissive.
Click Save and Compile.
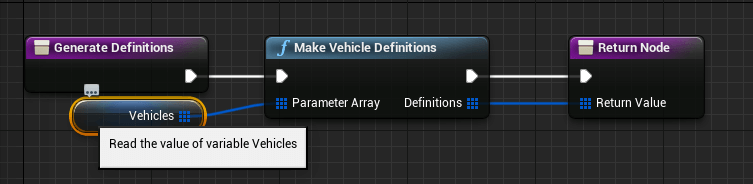
9. Add the vehicle to the Blueprint Library.
- In
Content/Carla/Blueprint/Vehicle, open theVehicleFactoryfile.- In the Generate Definitions tab, double click Vehicles.
- In the Details panel, expand the Default Value section and add a new element to the vehicles array.
- Fill in the Make and Model of your vehicle.
- Fill in the Class value with your
BP_<vehicle_name>file.- Optionally, provide a set of recommended colors for the vehicle.
- Compile and save.
10. Test the vehicle.
Launch CARLA, open a terminal in PythonAPI/examples and run the following command:
python3 manual_control.py --filter <model_name> # The make or model defined in step 9
Note
Even if you used upper case characters in your make and model, they need to be converted to lower case when passed to the filter.
Add an N wheeled vehicle
Adding an N wheeled vehicle follows the same import pipeline as that for 4 wheeled vehicles above with a few steps that are different.
5. Configure the Animation Blueprint for an N wheeled vehicle
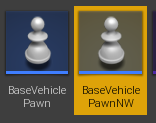
Search for BaseVehiclePawnNW and press Select.
6. Prepare the vehicle and wheel blueprints
Go to the folder of any native CARLA vehicles in Carla/Blueprints/Vehicles. From the Content Browser, copy the four wheel blueprints into the blueprint folder for your own vehicle. Rename the files to replace the old vehicle name with your own vehicle name.
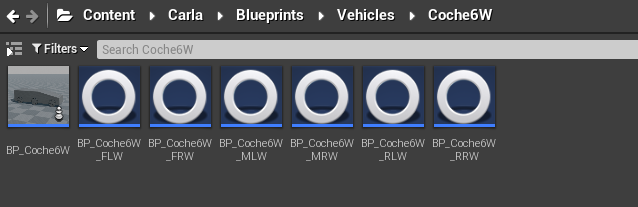
Copy the four wheels and copy again for additional wheels. In the case of a 6 wheeled vehicle, you will need 6 different wheels: FLW, FRW, MLW, MRW, RLW, RRW.
7. Configure the wheel blueprints
Follow section 7 as above for the 4 wheeled vehicle. The key difference in the case of an N wheeled vehicle is those affected by handbrake and steering parameters. In some vehicles (like for example a long wheelbase truck) the front 2 pairs of wheels will steer, and one set may steer more than others. The rearmost pairs may be affected by handbrake, the specifics will depend upon the vehicle you are modelling.
8. Configure vehicle blueprint
In the Details panel, search for wheel. You will find settings for each of the wheels. For each one, click on Wheel Class and search for the BP_
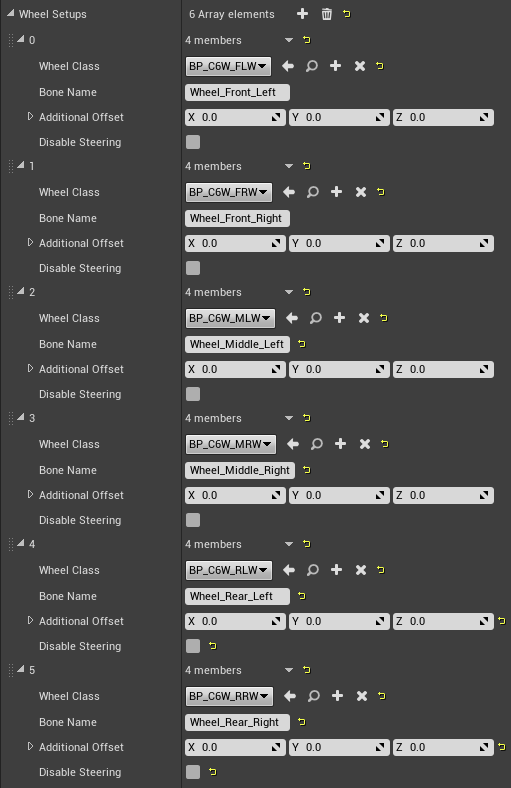
This is correct, but just to specify, in the case of N wheeled vehicles, you need to set ALL the wheels. This is an example with a 6 wheeled vehicle:
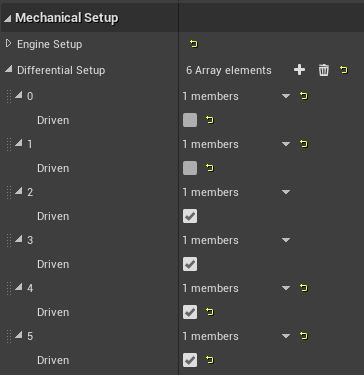
Finally, an additional consideration is setting the differential. In the case of a 4 wheeled vehicle, we have different presets of differentials (Limited Slip, Open 4W etc.) but with N wheeled vehicles, you need to choose on which wheels you want to apply torque. In this case, we have chosen only the middle and rear wheels have torque, while the front wheels don’t, you can specify other configurations. The numbers are going to be the same as the image above this text (e.g. 0 will be the Front Left Wheel, as specified above).
All other parameters such as engine, transmission, steering curve, are the same as 4 wheeled vehicles.
Add a 2 wheeled vehicle
Adding 2 wheeled vehicles is similar to adding a 4 wheeled one but due to the complexity of the animation you'll need to set up aditional bones to guide the driver's animation. Here is the link to the reference skeleton for 2 wheeled vehicles.
As with the 4 wheeled vehicles, orient the model towards positive "x" and every bone axis towards positive x and with the z axis facing upwards.
Bone Setup:
  - Bike_Rig:                   # The origin point of the mesh. Place it in the point 0 of the scenecomment
    - BikeBody:                 # The model's body centre.
      - Pedals:                 # If the vehicle is a bike bind the pedalier to this bone, will rotate with the bike acceleration.
        - RightPedal:           # Sets the driver's feet position and rotates with the pedalier if the vehicle is a bike.
        - LeftPedal:            # ^
      - RearWheel:              # Rear Wheel of the vehicle
      - Handler:                # Rotates with the frontal wheel of the vehicle bind the vehicle handler to it.
        - HandlerMidBone:       # Positioned over the front wheel bone to orient the handler with the wheel
        - HandlerRight:         # Sets the position of the driver's hand, no need to bind it to anything.
        - HandlerLeft:          # ^
      - Frontwheel:             # Frontal wheel of the vehicle.
      - RightHelperRotator:     # This four additional bones are here for an obsolete system of making the bike stable by using aditional invisible wheels
        - RightHelprWheel:      # ^
      - LeftHelperRotator:      # ^
        - LeftHelperWheel:      # ^
      - Seat:                   # Sets the position of the drivers hip bone. No need to bind it to anything but place it carefully.
1. Import fbx as Skelletal Mesh to its own folder inside Content/Carla/Static/Vehicles/2Wheeled. When importing select "General2WheeledVehicleSkeleton" as skelleton A Physics asset should be automatically created and linked.
2. Tune the Physics asset. Delete the automatically created ones and add boxes to the BikeBody bone trying to match the shape as possible, make sure generate hit events is enabled.
Add a sphere for each wheel and set their "Physics Type" to "Kinematic".
3. Create folder Content/Blueprints/Vehicles/<vehicle-model>
4. Inside that folder create two blueprint classes derived from "VehicleWheel" class. Call them <vehicle-model>_FrontWheel and <vehicle-model>_RearWheel. Set their "Shape Radius" to exactly match the mesh wheel radius (careful, radius not diameter). Set their "Tire Config" to "CommonTireConfig". On the front wheel uncheck "Affected by Handbrake" and on the rear wheel set "Steer Angle" to zero.
5. Inside the same folder create a blueprint class derived from Base2WheeledVehicle call it <vehicle-model>. Open it for edit and select component "Mesh", setup the "Skeletal Mesh"
and the "Anim Class" to the corresponding ones. Then select the VehicleBounds component and set the size to cover vehicle's area as seen from above.
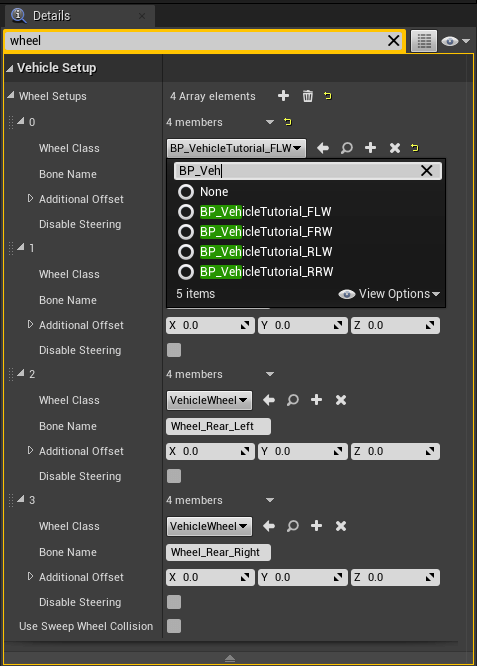
6. Select component "VehicleMovement", under "Vehicle Setup" expand "Wheel Setups", setup each wheel.
- 0: Wheel Class=
<vehicle-model>_FrontWheel, Bone Name=FrontWheel - 1: Wheel Class=
<vehicle-model>_FrontWheel, Bone Name=FrontWheel - 2: Wheel Class=
<vehicle-model>_RearWheel, Bone Name=RearWheel - 3: Wheel Class=
<vehicle-model>_RearWheel, Bone Name=RearWheel
(You'll notice that we are basically placing two wheels in each bone. The vehicle class unreal provides does not support vehicles with wheel numbers different from 4 so we had to make it believe the vehicle has 4 wheels)
7. Select the variable "is bike" and tick it if your model is a bike. This will activate the pedalier rotation. Leave unmarked if you are setting up a motorbike.
8. Find the variable back Rotation and set it as it fit better select the component SkeletalMesh (The driver) and move it along x axis until its in the seat position.
9. Test it, go to CarlaGameMode blueprint and change "Default Pawn Class" to the newly created bike blueprint.